Pages

Showing posts with label Boxes. Show all posts

Saturday, June 1, 2024

Winter Raccoon by Mo Manning


Today is the first day of Winter here in Australia so Winter Raccoon by Mo Manning was the perfect choice of image for me to use. 

I decided to use him in a little pop up box I saw recently during my time on Pinterest. This is the first time I've made one of these and I think it needs "tweaking" a little to perfect it - but it was so much fun and looks adorable when it's opened up and the raccoon rises up. I know I'm going to give another one of these a go at some stage! Here's the link to the tutorial I followed if you want to try one for yourself - let me know if the link doesn't work for you.

I decided to use a belly band around my pop up box rather than a ribbon, and the added decorative panels also strengthened the sides of the outer box.

Tuesday, October 2, 2012

A Christmas Sleigh


Just before Christmas last year I saw this gorgeous pattern for a cardstock sleigh from Sandra's Scrapshop but I held off as it was too late and I knew I would forget I had it in my looooooong to do list! Since Christmas is sneaking up on us already this year I thought it was time to buy it and have a play. 

Sandra is very clever and has designed this so it can fold flat for posting - an option I didn't use this time as I'm planning on filling it with a gift and giving it away. This pattern available as both a pdf to print and cut or - for lazy people like me - in cut files to be used with an electronic cutter. This was cut using my Cameo and my gorgeous little Make it Crafty Elf Floppy came out to help me decorate it - he doesn't know it yet but I'll be needing his help later to load the sleigh with goodies too!!!
I've used a Memory Box die to cut the snowflake flourish out and added some Make it Crafty chipboard snowflakes too. A few flowers, leaves, snow and sparkle and it was done!

Make it Crafty - 
Copics Used - Skin (E21, E11, E000) plus B99, B97, B95, B93, B91, B05, E47, E44, E43, E42, E41, E40, E08, T2, T0, YR14, Y13, white gel pen

EDIT - I was asked what the brown cardstock is and since I can't find any contact info for the lady who asked I'll pop it here in case she pops back - I used a brand called Cut Mates to cut out the sleigh as it's designed for electronic cutters. But I have punched the holly leaves out of Stampin' Up cardstock and this colour (which is an almost perfect match to the cut mates) - is called Soft Suede.

Wednesday, June 20, 2012

A Little Graduation Gift


I just realised I haven't shown you this little box I made! Recently my friend's daughter graduated from her university course and I wanted to give her a little gift. I found this little Graduation Cap Box in the Silhouette store and cut it out with my Cameo. I felt it needed a little something so I added some flowers, ribbon and pearls - before filling it with some gourmet jelly beans.

It's quite a clever little box because the ribbon handle is attached to the base of the box so the lid won't fall off while you're carrying it!

Friday, December 23, 2011

Merry Christmas To One and All


This will be my last post before THE BIG DAY on Sunday so it seemed right I show you this festive little Santa box I made. I saw THIS tutorial over at Amazing Paper Grace and couldn't help myself - I HAD to try it out - LOL. Unfortunately I don't have all the spellbinders dies Becca is lucky enough to own so I to re-work parts of it. His face uses a large circle nestability with the top taken off. The box base and lid are made from squares cut at 5 5/8" and scored at 1 1/4" all around and made into a simple box. My box is 6" high FYI.

I also noticed this week that my blog has reached 2 VERY exciting milestones at the same time - 200,000 visitors and 700 followers!!!! Because of the timing I'll be planning a VERY special surprise early in the New Year.

Now before I sign off I want to wish each and everyone of you......


Thursday, November 17, 2011

Mo's Dream Team Blog Hop


The third Thursday in the month means it's Mo's Dream Team blog hop time and the theme this month is "Make a Gift" and was chosen by the lovely Lori who is our host this month and the start of the hop. If you're already hopping you should have arrived here from the amazing Alice's blog.

I've created a gift box and have popped some jewellery and chocolates inside it for a little Christmas gift. I did buy some Ferrero Rocher chocolates to pop in but they were a bit too tall for the "shelves" so  I had to go shopping again and bought some Dove chocolates and made little dividers for them. In the meantime I managed to console myself with my bonus treat - LOL.

The box was made using THIS tutorial by Heather Perreaux I found - it's called a "Secret Box". I used Mo's gorgeous Lil Elf Pipa on the top - these guys are great at ANY size and since this box is only 3"x3" there wasn't a lot of space to play with.

Now it's time to hop on along to marvellous Mina's blog. Here's the hop list in case you get lost along the way...

LoriGretha, KerttuJaneJulieDebbie 4000HeidyAlice, Debbie {me}, MinaPopsJak

And if you're after more fabulous Mo inspiration from the Dream Team don't forget to check out the regular postings on our DT BLOG.

Copics used - R20, R11, E11, E00, E000, N3, N1, YR23, Y19, Y11, BG15, BG13, BG11, E51, E50, E18, E13, R89, R85, R83, R46, G29, G28, G24, G21 - note I coloured Pipa in the BG's and then thought she needed to be "greener" so went over the top of all the BG with G21. Don't be afraid to experiment with your copics.

xXx

Monday, March 14, 2011

A Fairytale Gazebo


When I saw one of the previews for Lauren Meader's March release for My Time Made Easy I was blown away by her 3D birdcage (available HERE) - it got my creative juices flowing! I bought the cut file the day it was released and cut out the pieces with my craft robo (silhouette) - and then they sat there!!! I knew what I wanted to do but needed to figure out HOW! I was inspired to create something for this month's Copic Oz Challenge - A Little Magic. I wanted to create a scene INSIDE the cage. I tried to add in a door that would open but the thick bars cut off too much of the view - so I decided to cut off the bars from the front piece entirely - thus creating a gazebo for my fairy scene. I've embossed the base and top bars for some extra interest.

I used Mo Manning's gorgeous fairy Summer Fairy Finna - available HERE. I printed her off twice - once in reverse. This way I could glue them back to back so the rear view would be Ok too. You can see her through the bars at the side in the photo on the left. I have been able to sit her up straight by attaching tabs between the two layers and then making a slit in the DP on the base to slide the tabs through and then I stuck them down.

Now you may be wondering what the little yellow flame shape at the front is - well I've popped a battery operated tealight up through the bottom and created a gazebo night light for a bit of ambience. The tealight base is hidden but easy to access to turn the switch on or off. The photo just doesn't do it justice as the light flickers like a flame and the glitter on Finna's wings shimmer.

This was such a fun project to do - and the birdcage was very easy to put together - especially as I didn't have to cut it out myself - LOL.

xXx

Sunday, March 6, 2011

Aa - aaa - achoooooo


It seems to me that no matter which side of the world you're on it's cough and cold time!! We are heading towards Winter and our Northern Hemisphere friends are starting to feel touches of Spring. With so many of my friends - and sadly myself - suffering with sore throats and snuffles I thought it was time to dress up a box of tissues! I found THIS fabulous tutorial over at Splitcoast Stampers to make a re-usable tissue box cover - it was soo easy to do!

I had the perfect image to pop on my cover - this is "Needs Mummy" from Mo Manning (available HERE). I just love his sad little face and soulful expression. I had to make his poor little nose a little bit red too - though it's hard to see here.

The embossing folder I used is from Sizzix - I LOVE these big dots!

Hopefully this will brighten up the sick-room and help chase those nasty lurgies away! And if you're feeling a bit under the weather...

Get Well Soooooooon!

And don't forget to enter my blog candy HERE - I'll be picking a winner sooooon!

xXx

Sunday, December 19, 2010

Magnolia Down Under Challenge #77 - A Gift For You

WOW I can't believe it - this is our last Magnolia Down Under Challenge for 2010!!! Because of this we are giving you extra time to enter - with our next challenge not starting until January 9th, 2011. This challenge is...

 "A Gift For You"

Now this can be a gift for ANY occasion and isn't limited to being for Christmas - especially as we are heading into the New Year with the challenge. But we are asking for something that is NOT a card!

I used Lauren Meader's "Home Made" template from Papertrey Ink, along with the matching stamp set, to create a little Christmas Gift Box. The finished size is 5 1/2" high by 4 3/4" wide so it's a perfect fit for the mini Tilda's. I popped mine onto a fence I cut using my Magnolia Doohickey die - I bent back a section and drew in some 'hinges" to create a gateway to the front door.

On the back of the roof I added in my tag greeting and some more decoration. This was soooo much fun to make and now all I have to do is fill it with something yummy - but not until just before it's given away or it may not be as full as it should be - LOL.

Don't forget to stop by the MDUC blog for some more AMAZING inspiration from this bunch of talented girls - I'm sooo honoured to have "worked" with each and every one this year - as well as the fabulous guest DTs we've had on board!

I'm entering this over at Magnolia-Licious Challenges where they have this wonderful Christmas scene as an inspiration piece - I hope my little cottage fits the bill!

xXx

Friday, August 13, 2010

Tickled Pink Stamps Meets Anya Ink

This week Tickled Pink Stamps is sponsoring the Anya Ink Challenge and the TPS team were able to join the fun. The challenge is a recipe - 3 flowers, 2 buttons and a bow. It was great to join in because it gave me the excuse to ink up my sadly neglected CC stamps - you can use either Greeting Farm OR CC Stamps for Anya Ink.

As you can see I haven't made a card - I actually made a little gift bag. The bag pattern is one of the 3 bags in Becky Roberts' (Inking Idaho) Tres Chic Handbag tutorial - and soo much fun to make. I decided to make this little bag for one of my fellow MDUC DT members to pop a little birthday present in - I know she LOVES handbags and I not only got to meet her yesterday in person for the first time but it was also her birthday.

I also made her a card to match - using the same designer papers and my Tim Holtz tattered floral die for the large flower. I didn't quite manage to use the full recipe on the card - but I did get to use another of my CC stamps!

xXx

Sunday, July 18, 2010

Magnolia Down Under Challenge #55


This week at Magnolia Down Under Challenges we are asking you to theme your creation around a SEASON - it's probably fairly obvious which season I went with - LOL.

I was really lucky to find this fabulous shadow box frame in an op shop (thrift store) recently. My daughter loves to find bargains amongst the clothing racks while I tend to fossic among the books and nick nacks on the shelves. The frame didn't need much work - I just had to open it up and remove the cheesy little wooden animals that were living in each square and give the glass a good clean.

Unfortunately I did find a problem with the frame - each square is only 3 1/4" high - and most of my Magnolia stamps were too tall! I had intended to do all 4 seasons - one per box - but these guys were 2 that fit and were both for Winter - so this became my "snow much fun" frame - LOL. There is icy glitter everywhere and I ended up sparkling for several days - LOL.

The best part was the depth of each frame - I managed to create a fun 3D effect in the "scene" boxes and pushed the other boxes up closer to the front by padding behind the DP - it's added a lot of interest and fun. All the DP is from Magnolia. I'm going to enter it in this month's Creatalicious Challenges where they're asking you to show something 3D - I haven't had a chance to enter over there for some time so it will be fun to play along - LOL.

Don't forget to to go and check out what other season's the DT have to inspire you this week at the Magnolia Down Under Challenges Blog - and check out the little prize parcel I've put together for some lucky winner!

And because today is my birthday AND because I've reached the incredible milestone of having 300 followers which is absolutely amazing and I'm grateful for each and every one - I've decided one random comment from this post will get this little prize parcel from me - it's a "pigeon pair" to the winner's prize I'm putting up at MDUC. There are 6 embroidered snowflake doilies/decorations I made, a pack of rhinestones, 6 charms and some Magnolia rubber - I'll announce the winner on Thursday, 22nd July - chosen because I'm a Thursday's Child with far to go - LOL.

xXx

Friday, April 2, 2010

Kristy's Anya Ink Challenge #1

To start off with the new look Anya Ink DT Kristy decided to give us an easy challenge - "Anything Goes". Did I say EASY?!?!?! I have decided I'm a gal who needs some direction - you should see all the half finished projects I started and then went - mah - try something else - LOL. This little gift bag/box was actually one of the first projects I started - LOL.

I wanted to make something to hold a small gift. My daughter often buys gifts for her friends that don't have really nice packaging - so I hear "Mum, I don't suppose......". "No probs" I say - "When do you need it?" Can you guess the answer .............. "I'm leaving in about an hour". Aaaagh!!!!! So I decided to be clever and get a step ahead of the game and make this for an emergency gift - LOL. I thought this Anya was a perfect party gal for the front. I've coloured her, cut her out and then stuck her onto some white card before re-cutting. This has had the dual role of covering up the back of the image where the ink has seeped through and giving her more strength sitting up above the top of the lid.

The top note purse is actually CASEd from Becky Roberts at Inking Idaho - you can find her instructions HERE. I've had these instructions in my "to do"file for some time - so it was great to finally get around to it!

My DPs are from my Basic Grey Bittersweet paper pad.

Now if you want to take this opportunity to make something you've been meaning to make for some time - or you just want to have some fun making anything you want - head over to Anya Ink and check out the rest of the DT inspiration and then have fun creating!!!!

xXx

Tuesday, March 9, 2010

What Is This????


Can you figure it out?????

Let me tell you I have one of the sweetest guys around! Last week I was trying to find a storage solution for my Copic and Touch markers. They have always lived in an ice-cream container which I could carry around with me to the rink when my daughter skated - or to friends - or even to the space I happened to be working in at home! The problem was the more markers I got the harder it was to find the right colours easily and some of them slid down and went missing amongst the others. Also I had heard you should store them on their sides!! Hmmmmmm - I looked in all the local stores for ideas and then hit the internet! I needed something that was easy to use AND portable!

I found THIS post that had a fabulous idea on it. I excitedly showed my hubby and asked if it was possible to make me one!!! He ummed and aaagh'd - he does that a lot!!! - and disappeared into his workroom with a couple of my markers. A little while later he wandered in with the inside of the box all made up - what a STAR!!!! Can you imagine his face when I asked if he could make one for a friend at the same time - after all - doing 2 at a time isn't much more work than making one and starting again is it?!?!?! AND we were giving him an excuse to use up some of the bits and pieces of wood in the garage ; )

But within 24 hours my friend and I were happily organising our colours and miscellaneous pens into their new homes!!! And look - I even have room for MORE - LOL. The next question - when will I have time to pretty it up a bit???

Thanx soooooo much honey - you're my hero!

xXx

Wednesday, January 20, 2010

A Sweet Little Lantern


Firstly I'd like to thank everyone for their comments and help with respect to my last post about SPAM - and I'm glad I may have helped some of you too. I have switched on Comment Moderation but not word verification - a happy medium as I can see what will get published BEFORE it gets published but I won't burden you with funny words! After looking at the SPAM it was definately a way of communicating so I'm not sure if word verification would stop this if real people were involved! Ah well - I'll see how I go - Live and Learn!

Now onto this post.................

Wednesdays are my DT day over at The Stamp Spot and as I mentioned to you last week Marcia has challenged her DT to use the same stamp for the whole month! This week I've made a cute little fairy lantern for a special little girl. To make sure there are no horrible accidents I'm going to be popping in a battery operated tea light to illuminate the lantern at night.

This stamp is a actually a fairy by Rachelle Anne Miller but I decided to clip her wings so she wouldn't take up the whole of the lantern. I toled the small mushroom again to add some extra dimension too. For some fairy sparkle I've outlined the lantern's "glass" with Ice Stickles - as well as popping some stickles onto her headband and the stamens in the white flower. Some green rhinestones finish off the bling - and what little girl doesn't like bling - or big girls for that matter -  LOL.

This fabulous lantern was originally designed as a Halloween lantern by the very clever Donna at Butternut Sage Designs - check her spooky version and the instructions out HERE. I had meant to make a Christmas version but it just never happened!

Don't forget to pop over to The Stamp Spot Online Store for Marcia's fabulous moving sale too - you can pick up the stamp and the stickles there while they are all a BARGAIN!!!

Now to work out what to do with this cutie for next Wednesday!!!

xXx

Monday, November 30, 2009

Christmas Can Be a Cracker


A couple of weeks ago I was shopping with a friend and came across a really cute Christmas cracker made by Jessica Walker Chocolates. It came with a chocolate inside. I saw the potential and decided to buy it - much to my daughter's surprise when I got home and she exclaimed "You paid $3.95 for ONE chocolate!!!" I quickly explained she was welcome to the chocolate - I wanted the box as a template - LOL. I can thank the lovely Karen Thomas from Luv to Stamp for teaching me to look at packaging and it's potential. A friend recently thought I was a little odd when I raced to KFC to buy some Popcorn Chicken for the box after seeing Karen's fabulous project - LOL - check it out here. Of course my popcorn chicken box is hiding somewhere in my crafting space waiting to be used as a template - but I know it's there when I want it!!!

I took the empty cracker off to Stamp Camp on the weekend - it was actually made in 2 parts but I wanted to simplify it and make it from a single piece of card. I've worked out the dimensions for you if you want to make one for yourself - yours will work out a tiny bit larger as I wanted to make the measurements a bit easier to follow!

To decorate mine I used DP and lace from Magnolia - available at Kellie's Magnolia Down Under Store. The tag is one of Bizzy Becs new Digital Tickets available at Bec's new Digi Downloads Store. The CS is from Stampin Up - Kraft and Real Red. The flowers were from a local craft store.

Now here are the measurements for you - feel free to contact me if they don't make sense! The great thing about these Crackers is that you can open then up easily without tearing them by simply untying the ribbon bows in the valleys!

Cut your card 7" x 5"
Across the 5" edge score at 3/4", 1 1/2", 2 1/4", 3", 3 3/4", 4", 4 1/2"
Across the 7" edge score at 1", 1 5/8", 2 1/4", 4 3/4", 5 3/8", 6"
Embellishments as desired.

Use the shaded areas on this picture to work out where to remove CS. For the triangles I cut from halfway up the middle score line in the section - this doesn't need to be acurate and I just pencilled mine in - it's where the cracker folds in. This score line is also the only one to be a valley fold - the rest are all mountain folds. The line across the top with the rectangles removed is the tab for the join.
I hope you have some fun with these - I will be looking forward to seeing yours - please let me know if you make one!

Now I better go feed the hungry hordes and have an early night!! Stamp Camp was sooo much fun but I had waaayyyy to little sleep - it was a little hard concentrating at work today - LOL. I do have more fun things I made at camp to show you - but some of them are DT work so will have to wait a little!!!

Hope you all had a FANTASTIC weekend too...

Edit - When Bec saw this she realised she had the sentiment wrong - I certainly hadn't noticed had you??? This one says "the means you" instead of "that means you". She has since corrected it and re-sent it to all those who had already bought this set! So if you had noticed the mistake don't let it put you off buying these fabulous digital tickets.

xXx

Sunday, November 22, 2009

Magnolia Down Under Challenge #27 - Something for Christmas


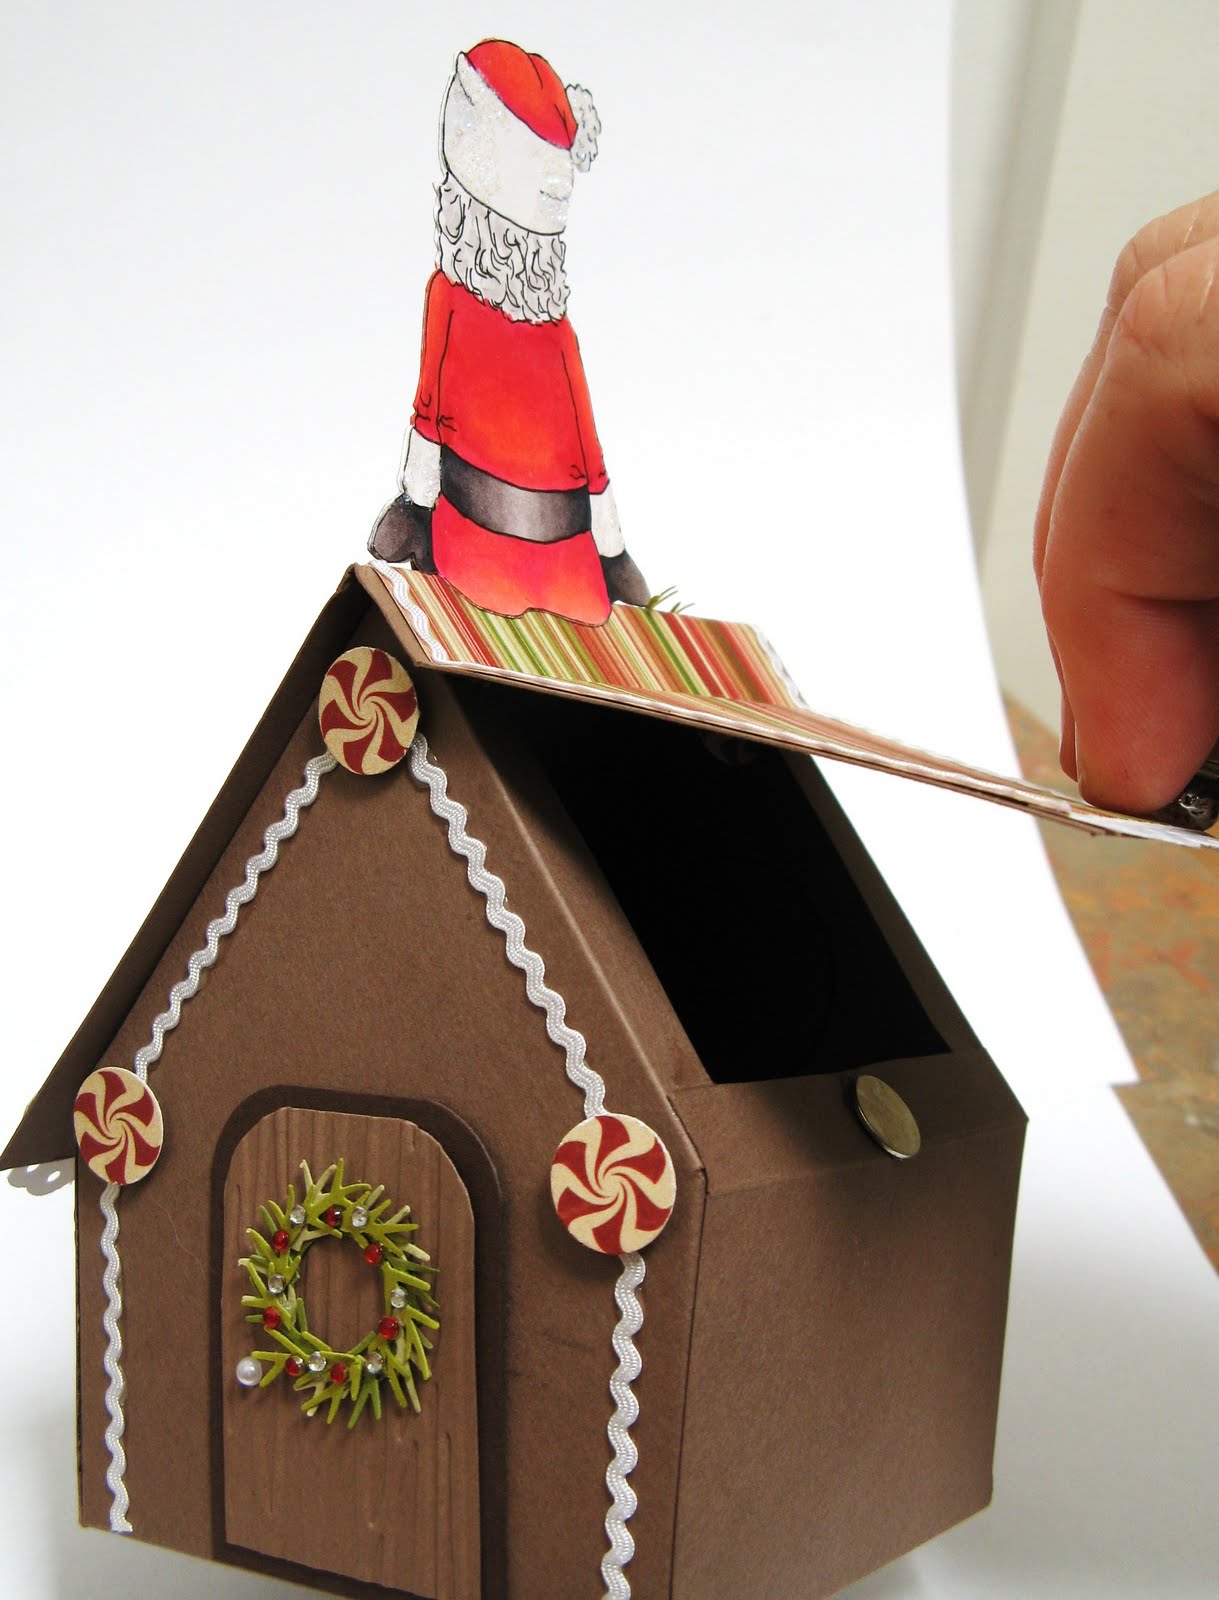
This week's challenge over at Magnolia Down Under Challenges has been a bit of fun - to make something for Christmas! Now don't get scared off - it CAN be a card! I had an idea for this Gingerbread House when I received my first edition of Magnolia Ink Magazine from The Magnolia Down Under Online Store! In the magazine there was a tutorial for an adorable birdhouse - I have basically just adapted that tutorial to make this! The major differences are that I haven't cut out the bird house "hole" and I've made the flap fold up about 1/2" below the top of the roof - so I didn't have to put a bend in poor Santa's tooshie - OUCH! It's a fairly simple box - I am very tempted to make another more elaborate one - but I was running out of time! I think a few chockies in here and it will make a great little gift for someone!

You may be wondering HOW Santa ended up HAVING a tooshie - LOL. I used a very pale pink inkpad - SU's Pink Pirouette - and my mirror image stamp to stamp Santa in reverse onto some Whisper White CS. I then free hand pencilled in Santa's back view before going over it with my Copic liner and colouring him in. I really wanted him sitting on the roof top and just couldn't come up with another background I liked to cover his back! He's sandwiched together at the top with the front of Santa and just split over the pitch of the roof.
I also made the little wreath for the front door. I punched a ring out using my 1/2" and 3/4" circle punches. The fronds were the tips off the fern punch. I used 3 different tones of green and some mini red and clear rhinestones for decoration. I've added a white pearl for a door handle too.
The mini white ric rac was found at the Paperific show last weekend - perfect!!! I punched the "lollies" out of some 2007 Cosmo Cricket DP I had - using 1 in a build-a-brad for the handle of the box - the brad was fed through a bead to before being fixed so that it sat up a bit. A magnetic clasp holds the lid shut. The roof DP is from Kaiser.

Now off you go to check out what the rest of the MDUC DT has made to inspire you. And thanx to Kellie for sponsoring the challenge with this gorgeous stamp for our winner...hmmmmm - wonder if I can enter under another name - LOL.
STOP THE PRESS!!!  Special on Magnolia Christmas Stamps at Kellie's….

From today until Wednesday, 25th of November 2009 you can get 20% OFF any Christmas stamp available in store at Magnolia Down Under. It has finally been confirmed that these gorgeous guys and gals will be arriving at Kellie's around the start of the week. The excitement from the DT is infectious so jump on board and join the fun!!! LOL.

Pop over HERE and don’t miss out!

xXx

Friday, November 6, 2009

Donna's Fabulous Hexagonal Gift Box

The lovely Donna over at Butternut Sage designs has come up with a wonderful tutorial to make this fabulous hexagonal box - check out Donna's beautiful version HERE. I love unusual shaped boxes so I had to pick up the tutorial and give it a go!

I've added a magnetic clip to the inside to hold the top in place - these are from Basic Grey and are the small size - I found them at The Scrapbook Boutique.


I've also sandwiched the ribbon between the base of the box and the outer bottom layer - but you don't have to do this!

When I showed my hubby and DD the finished box they were most impressed - my daughter told me it looked like something you'd buy from The Body Shop!!! High praise indeed - LOL. I'll be making a few more of these - some Christmas ones for teachers for starters!

To give you an idea how big the box is each of the six sides measure 2 1/2" square.

All supplies are from Stampin' Up with the exception of the magnetic closure and satin ribbon.

xXx

Sunday, October 11, 2009

Magnolia Down Under Challenge #24 - Trick or Treat

This week's challenge over at Magnolia Down Under Challenges is Trick or Treat. I've said before that we Aussies don't really celebrate Halloween - although I LOVE some of the DPs and stamps I'm seeing on the American blogs and wish we had them here!!! I was VERY lucky to find one set of Pink Paislee DPs instore at my local Scrapbooking Shop though- and had stamped a couple of Kellie's witchy Tilda's a few weeks ago to play with so I had something to use for this challenge.

It may be hard to tell but this actually isn't a card! It's made from a wooden shadow box frame kit I found at the same scrapbook shop I found the DPs, the chipboard fence was from there too. I used one sheet of DP for the background - it had this marvellous design in the corner! I used some sparkling black EP to coat 2 die cut bats and one chipboard branch. The branch was attached to the inside of the frame to give the tree some depth. Witchy Tilda is coloured up this way after I saw the stage show Wicked and loved the green skinned Wicked Witch! Tilda also has Crystal Effects on her boots to give them shine and black stickles on her belt.

I'm not sure where this little gal will end up hanging - but she was a LOT of fun to put together! It's nice to do something other that a card sometimes!

Our wonderful sponsor this week is Bloomin' Pages Online store - they are offering a gorgeous stamp from Alota Stamps as the prize - check it out here at MDUC - along with all the other fabulout DT inspiration.

xXx

Friday, October 2, 2009

A Catch Up Of Some Projects!

With all the excitement of announcements and blog candy I thought I would slow down and catch my breath and show you sme projects I haven't posted yet!

This recipe swap was for the theme of Grilling! When we lived in America we became BIG fans of Cajun cooking and all of our visitors got introduced to this fabulous cuisine. Of course I HAD to bring a little bit of Cajun home with me - and many of our friends have enjoyed Cajun Blackened Fish on BBQ days at our house - so what better recipe to share with my fellow swappers. I paper pieced my favourite SU chef and popped some black pearl buttons on his top - very swish! A vibrant little fish from Fishy Friends (retired SU) looks quite happy on Cheffie's platter popped up on Dimensionals - hope he stays that way - LOL! Some Circle Circus stamped on the background for bubbles and a colour scheme to suit the recipe and I was done - and then 6 more needed to send off!

This is the other Card and Tag set I made for my library workshop - see here for the one we'll actually be making on the day and the class info. I wanted to show how the same concept can look soo different with DP. I LOVE this Ski Slope DP - think I have enough stocked for the next 10 years - LOL. I have 3D'd the Christmas tree by stamping and cutting out 3 extras on Old Olive and folding them in half before gluing them together - perfect for the recessed window card! A star brad on top hides the slightly messy top where all the points meet!

And this is the little box and bow we'll be making on the day! The box idea comes from the lovely Stampin' Alley and is 2 1/2" square. The bow is a smaller version of Dawn's from her video here. The bow dawn makes is pretty big so I needed to adjust the measurements to fit this cute box! Wouldn't these look great at each table setting on your Christmas table?

xXx