Pages

Sunday, July 29, 2012

Magnolia Down Under Challenge #157


This week at Magnolia Down Under Challenges we are making or altering BOXES. I decided it was time to create something with a more masculine feel to it so I cut out this treasure chest with my cameo and decorated it. Of course it is filled with gold (and chocolate) so I'm sure any pirates I have around will enjoy it - even though Pirate Edwin is on guard with his sword unsheathed - LOL.

I added some chipboard elements from Scrapmatts  which are not only decorative but practical too - the ship wheel helps to hold the chest closed. I've used my copper gelly roll pen from Scrapmatts to colour the chipboard - it gives it a fabulous rich glow when the light hits it. The "bubbles" are buttons I found at the recent craft show I went too.

And so me hearty's - don't forget to sail on over to the Magnolia Down Under Blog to see what the rest of my shipmates have created to inspire you this week.

Copics used - Skintones {E11, E00, E000, R11} plus 100, W7, W3, W1, Y28, Y26, Y23, Y08, R59, R39, R17, E29, E25, E23, YG61


Friday, July 27, 2012

Seeing Circles at La La Land Crafts


This week at La La Land Crafts we've been asked to create circle cards. Now I went a little interpretive with my card but did get the go ahead from the lovely Irina. The teapot is basically a circle - albeit a bit out of shape with added bits - LOL. But the base IS a circle. I've used the top of LLLC's Heart Tree die on the bottom as a trivet or doily - it shows the versatility of these amazing dies! 

I cut the tea pot out using my Cameo - from a pattern available in the Silhouette store. Of course I DO know  you usually pop tea bags INSIDE the tea pot but then you wouldn't have seen them - LOL.

Don't forget to pop over to the LLLC Blog to check out what the rest of my teamies have been up too.

La La Land Products used - 

Copics used - 
Skin - E11, E00, E000, R20, R11 (lips R24)
Hair - E44, E43, E42, E41, E40
Clothes - R27, R24, R22, R20, 100, C8, C6, C5, C4, C1, C00, G46, G43
Tea Cup - R27, R24, R22, R20, G46, G43, YR20, YR0000
Tea Bags - E44, E43, E42, E41, E40


Wednesday, July 25, 2012

Alisa in Green


Green is my favourite colour and recently a friend of mine reminded me how beautiful cards done in green can be. I was inspired to colour up Mo Manning's Alisa with Roses in green tonings. She's such a gorgeous image that I felt she deserved to be framed with this beautiful chipboard frame from Make it Crafty and I blinged it up with my gelly roll pen over green copic - it gives a more delicate sparkle than using glitter.

Copics used - Skintones (E11, E00, E000, R20, R11) plus YG67, YG63, G21, G20, R85, R83, R81, R59, Y21, W1, W00, E35, E33, E31, E30, E08


Friday, July 20, 2012

CHA Release Showcase from La La Land Crafts

Well it's that time of year again ....CHA! And this time around La La Land Crafts have a HUGE release to bring to you - there is something for EVERYONE! So hold onto your hats and check out what we have in store for you - this is a long post but there's so much to show off! And be sure to see the AMAZING projects from the rest of the LLLC DT on our BLOG


For my first card I created a circular carousel card cutting the carousel tent top out using my Silhouette Cameo.

La La Land Stamps - 
NEW Carousel Horse

Copics used - Marci
Skin - R20, R11, E21, E11, E000, R24(lips)
Hair - 100, C8, C5, C2
Clothes - B02, B00, B000, B0000, R39, R27, R20, C8, C5, C2, C00
- Carousel Horse
Pole - YR27, YR23, YR19, Y13
Horse - Y21, E41, E39, E39, E35, E33, E30, E11
Horse's "Costume" - R39, R27, R24, R20, B05, B02, B00, B000, YG17, YG07, YG03, YG01


For my second card I popped 2 of the new images together to create a fairytale story - or my version of one anyhow - LOL.

La La Land Products - 
NEW Daisy Faerie Marci
NEW Book Stack

Copics used - 
Skin - R24, R20, R11, E13, E11, E00, E000
Hair - B41, B34, B0000
Daisys - YG67, YR23, Y19, Y12
Clothes - Y19, Y13, Y11, B41
Wings - Y11, Y00, Y0000, E30
Books - YR23, Y21, E49, E39, E37, E35, E33, E31, E30, E29

Other - Sakura Gelly Roll Pen

Our Aussie stamps were released exclusively in Australia last month, but they are finally available to all our customers NOW!


Now for all the NEWBIES!!!


Here is the list of the NEW dies, photo is below (please click on photo to enlarge to see the details).
Lotus


All of these NEW products are now available for PRE-ORDER in our online store!  
Click HERE to go SHOPPING! 

In addition to showcasing these amazing stamps and dies, we are having a GIVEAWAY!!

Our giveaway consists of:
THREE NEW Rubber Stamps - Tea Time Marci, Tea Time Set and Carousel Horse
TWO NEW Dies - Hot Air Balloon and Wings Set
set of 12 Copic Sketch Makers in new colors
and a pad of 6 x 6 Prima paper

How to enter? The only thing you have to do to be eligible is to leave a comment on THIS POST over on the LLLC Blog....EASY PEASY!!


Thursday, July 19, 2012

Mo's Dream Team Blog Hop


Yup - it's that time of the month again when Mo's Dream Team get together to play. This month our wonderful hostess with the mostest is the Marvellous Mina and she's asked us to play with 'ribbon'. If you're already hopping you should have arrived here from the oh-so talented Alice's Blog.

I chose to use Mo's gorgeous image "Gloria" and pop her in a fairly simple layout. I used my wave die from La La Land Crafts and a bubbly embossing folder to add some fun. And of course finished everything off with a ribbon and bow.

As last stop on the hop I want to make sure you've checked what the rest of the gals have created so make sure you head to the start at Mina's Blog if you haven't been there already!

Blog Hop order (you'll find the links on my left sidebar under Mo's logo) -

Mina, Pops, Jak, Gretha, Jane, Julie, Debby.Y, Heidy, Alice, Debbie.

Copics used - Skin (E11, E00, E000, R20, R11) plus E44, E43, E42, E40, R39, R27, R17, YR23, Y19, Y11, Y08, Y00, G28, G24, BG0000

Sunday, July 15, 2012

SURPRISE Baby Shower over at Magnolia Down Under Challenges


This week at Magnolia Down Under Challenges we have a VERY SPECIAL EVENT happening ....

 A SURPRISE BABY SHOWER for our very own DT member Louise!

Louise is expecting her 2nd child any day now and she assures us she's having a baby girl - and given the 'pinkness' I've produced I hope she's right - LOL. The theme of this week's challenge is "Shabby Baby" for obvious reasons - although poor Louise may have different theme posted on her blog as we had to "put her off the scent" of all of our sneaky planning - LOL. Let's hope she forgives us!

I have already made a card to send so I decided to create something a bit different. I used the new Mini Book Box Kit from Make it Crafty to create a little gift box to send to Louise. I wanted it to be girly but not especially baby as hopefully her new daughter can use it for keepsakes as she gets older - unless her big sister pinches it first - LOL.


When you open the box up you'll see I added a gorgeous poem about daughters I found on Pinterest - although sadly I couldn't read the author to include their name (you can click on the photo to enlarge it if you wish to read the poem). The chipboard rocking horse and flourishes are from Make it Crafty too. I glittered to rocking horse up with pink glitter for some girly bling.

I also made a cute pair of kimono baby shoes - another find on Pinterest (you can get the pattern for these HERE). I used 2 complimenting flannel fabrics for these so they would be extra snuggly. I was going to pop a flower on the tops but knowing babies I didn't think I should add anything that could become a choking hazard.


 And just a touch of whimsy to go in the box - I made a little leather bound key chain book where special fairy wishes or notes can be written as a keep-sake - another Pinterest find - LOL. You can find the tutorial I used HERE  - but I have changed it slightly to make it easier. I used one of a cheap pair of ear-rings for the dangly bits and the crest was created using a chipboard ribbon slide from Make it Crafty, and a diamante and pearl button.


 I decided I wanted to soften the look of the spine of my book - so I attached a strip of calico - holding it place one each side but leaving it un-glued around the spine so I didn't compromise the movement.

 And here it is all together in the box - I just need to wrap it up and send it off.

 I KNOW the rest of the MDUC DT will have come up with some amazing baby fun to help share this exciting event - so pop on over to our BLOG and check out all the FUN! 

And Louise - ALL THE VERY BEST SWEETIE - we can't WAIT to meet our newest recruit!

Copics used - skin (E11, E00, E000, R20, R11) plus R85, R83, R81, R01, R000, E44, E43, E42, E40, 100, W5, W3, W1, W00

Saturday, July 14, 2012

Tickled Pink Stamps is Sponsoring Winter Wonderland Challenges


This week Tickled Pink Stamps is proudly sponsoring Winter Wonderland Challenges where of course the theme is Christmas - but this time the twist is to use your a sentiment as your focal point. I used the handsome  Lil Christmas Lad Luca and paired him with a Unity Stamp called "Christmas List".

I hope I've inspired you to play along too - there are Tickled Pink digis to be won!

Copics used -Skintones {E11, E00, E000} plus R39, R27, R24, BG99, BG96, BG93, G24, E44, E43, E42, E41, C2, C0, Y19

Friday, July 13, 2012

La La Land is Playing with Embossing


This week at La La Land Crafts we are playing with embossing. I chose to pull out some embossing folders instead of my embossing powders and got to work.

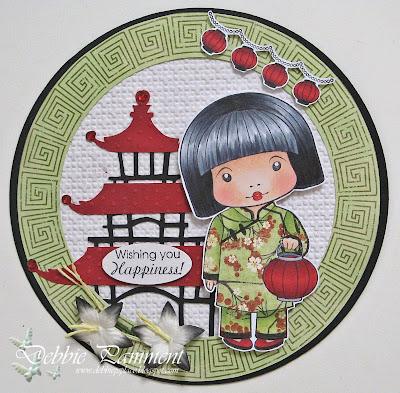
I just LOVE the new Asian images as I lived in Asia for some time and have lots of Asian pieces in my home. I chose to use Marci with Lantern with both of her accessory stamps. The circle was cut out of the pattern of one of the DPs in my Bo Bunny 6x6 paper pad - circles have a significance in Chinese culture. The  DP used to paper piece her outfit is from the same paper pad. The Chinese pagoda was cut out using my Cameo from a pattern available at the Silhouette Store. I embossed the panel behind the circle and the roofs of the pagoda.

Don't forget to check out what the rest of the LLLC DT have gotten up to over on our BLOG.

Copics used - 
Skin - E11, E00, E000, R20, R11, R24(lips)
Hair - 100, BV29, C7, C5, C3
Shoes and Lanterns - 100, C4, R89, R39, R27
Shading on Clothes - YG61, YG0000

DP - Bo Bunny Serenity

Thursday, July 12, 2012

UPDATED Tutorial for Merging Digital Images Using paint.NET


A while ago I created a tutorial for merging digital images using a free downloadable software called paint.NET as many of us don't have photoshop to play with - you can check out that tutorial HERE. Many digis come with a white opaque background which needs to be erased and this update is mainly for those. Some months after I posted my tutorial I received a lovely email from a lady by the name of Teresa - in it she said...

"I just wanted to thank you for the free download it is amazing .....I was just showing my son who is a computer geek he showed me a great way of rubbing out the top layer to show the bottom layer I thought I would let you know as it is so quick......Hope you find this helpful thanks again love all your cards so much,  keep on inspiring people
Teresa xx"

Well it took me a little while to find the time to play with this method and sort it out but I am FINALLY passing this info onto you as an Updated Tutorial....here goes. Be warned it's picture heavy as I'm a visual learner and prefer to help you that way too and I wanted it to be a complete tutorial so I'm repeating many of the steps from my orginal tutorial.....

Also - you can click on individual pictures to get a close-up if you need too!


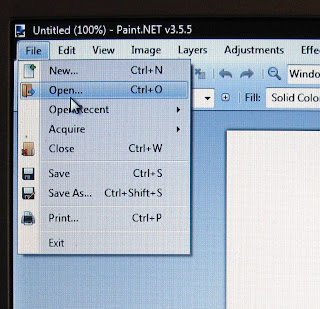
The first step is to open up the program and click on "File" to get the drop down menu. Select "Open"

Choose the image file you want to use - make sure it's the one that will the back image of your merged images - this is important as the second image will be sitting over the top of this one - so plan ahead! Click on the image you've chosen and then press "Open". I've chosen the adorable image "Kite"  - you can find him HERE in Mo's store.

Once he's open we need to make some room for the next image.

In the top menu click on "Image" to get the drop down menu and then click on "Canvas Size".

This screen will open up and you can use the placement boxes at the bottom to determine the position on the page of your first image.You will also need to make the picture area larger - you can do this by changing the width and height under the pixel size. For this example my next image won't be taller than Kite but she does sit lower - so I'm just going to make the canvas size wider and higher and postion Kite on the LHS in the middle. Don't worry if it looks too big - you can crop your final picture down later. 

After pressing "OK" my new picture space looks like this. Before taking the next step make sure everything looks OK to move on - because once you move onto the next step you can't change anything done up to now without coming back to this spot. But if it's not right you can still change the canvas size and positioning before moving on.

Now to add in my next image!

I've chosen the super cute "Waiting for the Parade" image to combine with "Kite" this time - you can find her HERE in Mo's store.

AND NOW FOR THE UPDATED PART OF MY TUTORIAL!!!! Before you add your next image you need to open it in a separate window so you can remove the background to make merging easier.

Once you've opened her up you need to go to the drop down tools menu and select the MAGIC WAND.

Move over to the image and place the wand somewhere in the background and left click. You'll see the background turn blue - and sometimes parts of the image will too - in this case her face and bows. Be aware that all of these blue areas with become clear once you've finished so the image you are layering over the top of may have to have areas erased to accomodate for the clear areas - I'll show you what I mean later. 


Once you have the area blue hit DELETE and you'll see a checkered pattern appear - meaning these areas are now clear. 


There may be parts of the background that have remained white - just click on them with the magic wand again to clear. You can also clear areas like clothing for layering your image over digital papers for digital paper piecing - but that's ANOTHER tutorial - LOL.

To keep the background clear you need to save her in .png format so select the "save as" option from the menu and then select .png. Hit save and a "save configuration" box pops up and you hit OK. Now it's time to merge her in.... 


Go back to where you have your original image loaded with the canvas size enlarged. Then to add her in you go "Layers" in the menu and select "Import from File" from the drop down menu. Then find, select and open the file you want.

After you press "Open" she'll appear on your screen somewhere. You may find your second image is out of proportion to your original image - you can re size it by placing your cursor on the corner of the image box and shrinking or enlarging it to fit. You can see that the areas around her are clear letting you see your first image clearly.

Then just drag your new image into place. You can see where some of his jacket is visible in the middle of her forehead - this was what I was mentioning before. If you wanted to pop her here you would have to use the "undo" bottom to remove her and be able to erase this portion of his jacket.

To erase just go to the "Tools" menu and select "Eraser" from the drop down menu. It will come up fairly small but you can change the size using the "Brush Width" option - located to the right  of "Tools" in the menu bar.

Luckily for me where I want to pop her there isn't an issue - so I just slide her into place.

Once you're happy with your merged image you're ready to save it. Go to "File" on your menu and select "Save As".

Select a name for your file and then use the drop down menu to save your file  - I usually save as a JPEG file but you can save in whatever format you like!

If you're saving as a JPEG this screen will pop up first. Just press OK.

Then you'll see this screen. You need to flatten the 2 images together into one.

Your next job is to crop the image down to remove the excess canvas - you can use whatever software you usually use for cropping. You can use Paint.NET too - just re-open your merged image into the software and draw a rectangle around what you want to save - using the "Rectangle Select" tool. Then go to "Image" and press on "Crop to Selection" in the drop down menu. Save your finished project.

You are now ready to print out as per normal.

I hope you find this tutorial useful - please feel free to ask me if you have ANY questions and I shall endeavour to answer them!

I used this week's sketch from Sketch Saturday to help me finish my card.


Copics used - Skin (E11, E00, E000, R20, R11) plus R39, R35, R27, R24, E44, E42, E40, C2, C00, BG99, BG96, BG93, BG91, B34, YR27, YR23, Y21, Y13