Pages

Wednesday, June 30, 2010

Tickled Pink Stamps New Lolitas - Meet 30s Lylah

Today at Tickled Pink Stamps we're exploring the 1930s with the wonderful Lylah - with her fabulous hat and coat she's a very stylish Miss! This is the third of the new Fashionette Lil Lolitas and we hope you're enjoying the releases as much as we are enjoying bringing them to you!

If you pop over HERE to the Tickled Pink Stamps Blog you can check out what the rest of the AMAZING DT have done with Lylah - I've been enjoying checking out these amazing creations as much as anyone! These stamps are certainly showing their versatility with all the different ways they've been used! And don't forget to find out how you have a chance to win this cutie too while you're there!

These gals will be available for pre-order very soon - we have 3 more FABULOUS gals to show you first! And once again I must remind you that Tickled Pink Stamps DOES ship stamps internationally - just as well because this is the only place you'll get them!

Three decades down - can you guess where will be visiting tomorrow - don't worry if you can't - just pop back!

xXx

Tuesday, June 29, 2010

Tickled Pink Stamps New Lolitas - Meet 60s Ivy

THIS IS MY SECOND POST FOR TODAY - please scroll down if you want to check out my Burtonesque Dolls DT card for our latest challenge

Today's Lil Lolita preview from Tickled Pink Stamps has jumped ahead a few decades - we're now in the 60s with Ivy. I thought this Basic Grey DP had just the right groovy feel for Ivy with her long white boots - am wondering where Austin Powers is at the moment actually - LOL. The sentiment was also bought from Tickled Pink Stamps - it's one of a set designed to go with the Sweet November Mermaids but went perfectly for my 60s card!

Don't forget to pop over to our blog HERE and check out what the rest of the DT have done with Ivy - you'll be amazed! You can also find out how to have a chance at winning this cutie for yourself too. Pre-orders open on the last release day so remember Tickled Pink Stamps DOES ship stamps - but only stamps - overseas!

Be back tomorrow with a new decade and a new Lolita!

xXx

Burtonesque Dolls Challenge #9 - A Vampire Movie Poster!

What a quirky challenge we have for you at The Burtonesque Dolls today. If Tim Burton were to write a Vampire Movie what would the movie poster look like??? Now I may have taken the challenge a little tooo literally - but I often do - LOL.  I also took the liberty of Tim Burton asking TBD to help with the directing (I know - unheard of - but it's all just a bit if fun) and Simply Betty Stamps helped with the Producing! Afterwards I realised I should have let Simply Betty Stamps be in charge of casting as we are showcasing the fabulous new digital range of Vampy Vamps being released at SBS this week. I've used the Count and Countess but there are SIX new Vampire images to choose from. You can check out what the rest of The Dolls have come up with using these guys HERE.

You also have a chance to win the entire SBS Vampire release - that's 6 quirky vamps - if you enter the challenge this week! And don't foget Betty's sale ends Wednesday, June 29, 2010, at 11:59 pm Pacific Daylight Time at Simply Betty Stamps - check out the amazing deal HERE

For my "poster" which is actually a card for someone, somewhere, sometime - LOL - I used WordArt to create my movie title - not very original but all the good ones have been used lately - LOL. I printed the whole poster off as one onto Vanilla CS - and then re-printed the 2 Vampires. I also added the bat from SBS's "My Pets" digis range. I used a CS circle to mask out a "moon" and sponged grey and yellow chalk around it for the lunar glow. Once I removed the circle I added in some details. Some trees stamped from SU's Branch Out set added some more atmosphere. I then coloured up the separate Vamps, cut them out and popped them up on some dimensionals! I just couldn't leave the whole thing tooo flat - LOL.

One of the things I love about being a Burtonesque Doll is the FUN - I would never have made this up otherwise and I thoroughly enjoyed the challenge! Hope you find some time to play along too!

xXx

Monday, June 28, 2010

Tickled Pink Stamps New Lolitas - Meet 20s Evie

YAY - we finally get to showcase the FABULOUS new Lil Lolita range from Tickled Pink Stamps! You are going to LOVE them! Many of the DT think these are even better than the original Lolita's - but I just CAN'T play favourites! Over the next six days we'll be previewing the six new releases - YES I said SIX! We have all the originals back in fashions from different eras and a gorgeous NEW gal to introduce to you too - so we hope you enjoy the ride!

This is 20s Evie - she was wearing the purrfect cat outfit in the last release. You can also check the amazing cards the rest of the DT have put together with 20s Evie on our blog HERE, and while you're there check out how you have the chance to win this cutie for yourself!
I used some Basic Grey DP and some gorgeous lace I bought from my fellow MDUC DT member Chantelle's Etsy store Simply Cards and Creative Bits.

These stamps will be available instore soon - preorders open on the last day of previews. And remember Tickled Pink Stamps ships STAMPS ONLY internationally - so you overseas gals make sure you get your orders in too!

CYA tomorrow for our next preview!

xXx

Thursday, June 24, 2010

It's Sale Time at Simply Betty Stamps

Simply Betty Stamps are having a Summer Solstice Sale! In celebration of the official start of Summer in America Betty is having a sale!!! It starts from now and runs through to June 29th - check out all the details HERE - there's more than 30% off on one offer!!!

There are also new items being listed instore HERE - papers, embellishments and new digital images - so don't forget to pop in and check out what's there! And there are new releases planned soon too - so keep tuned - woohoooo!

Now onto my card - I've used the fabulous Lola here - such a great image for teens. After seeing a young woman down the street with bright pink hair I was inspired to do the same to Lola! Her luscious mane of hair is definately an attention grabber! I paired her with some basic grey DP and black embellishments - and plucked the Kiwi Kiss green out for some contrast.

xXx

Tuesday, June 22, 2010

Burtonesque Dolls Challenge #8 - Toe Tags!


Recently I found this tag album in the bargain bin at my local Scrapbook shop - and of course who can resist a bargain - it would come in handy one day - LOL. Well today is the day! This week at The Burtonesque Dolls we're asking you to create a "Toe Tag" based on the movie Beetlejuice. Think Tim Holtz styled tags - tags on your layout - tag shaped cards - tag albums etc. You can get some FABULOUS inspiration from the DT gals at TBD blog HERE.

I've used this Tiddly Inks bridal couple to represent the wedding between Beetlejuice and Lydia - and created a quirky little wedding album front.

The charm, mesh ribbon, heart doily and rhinestone flourish all came from Tickled Pink Stamps. The patterned acetate scrap was from Delicious Papercrafting.

Hope you can come along and play in the Doll House this week!

xXx

Sunday, June 20, 2010

Magnolia Down Under Challenge #51 - Embossing


This week's challenge at Magnolia Down Under is to use embossing somewhere on your creation. This can be dry embossing or heat embossing so there's lots of opportunity to play along.

I've seen a lot of white on white cards lately and used them for my inspiration - I wanted the embossing and my Tilda to be the stars. I've used 2 different cuttlebug folders for my card - Swiss Dots and Script. It's a bit hard to see the script - I used my largest circle nestie to cut a shape out and then embossed before adding some stickles around the edge. The flowers are arranged around the edge of this cirlce. I've used stickles on the edges of a most of my white pieces to define their shapes - boy does this card sparkle - LOL. A bit of lace and a couple of little butterflies add some more textural interest.

Don't forget to check out the rest of the amazing inspiration the DT has provided for you HERE - these gals always amaze with with their talent. Hope you get a chance to join us too.

xXx

Friday, June 18, 2010

Prima Ballerina On Stage Now


This is one of Mo's most recent releases called Prima - you can find her instore HERE! I love her haughty expression and wonderful thighs - so much like mine - LOL. I felt the need to create a stage for her to dance on - so I did. I added lots of texture and depth to this to achieve my stage - hope I pulled it off. She looks very glittery IRL - I have covered a lot of her costume with my Spica pens - you can see a bit of the sparkle in the picture on the left.

I'm entering this over at Mo's Challenges too - they're asking you to use dry embossing - think I've done that - LOL. I used my Forest Branches folder to put the folds in the stage curtains and the background was done with Floral Fantasy - both cuttlebug folders. You should pop over and check out the AWESOME work from the challenge DT too.

The weekend is nearly upon us so I hope you all have a GREAT one!

xXx

Thursday, June 17, 2010

Mo's Dream Team Blog Hop - Glitter


How excited am I - this is my first month as a permanent member of Mo's Dream Team - and before I go on to talk about my card I just want to thank the girls for making me feel soo welcome!

Just in case you get lost along the way the hop order is ....


This month we have the lovely Shell hosting the hop and she has challenged us to use GLITTER - not much of a challenge for many of us - just a challenge to get across in a photo! If you're following the hop you should have arrived here from the Sparkling Cheryl's Blog.

When I realised the challenge was Glitter the first thing I thought of was Mo's gorgeous fairys! But because  I used 2 of Mo's fairy's in last month's hop I decided to challenge myself with a different theme. While I was out walking the other day I saw an elderly couple walking hand in hand - they reminded me of Mo's Jack and Ginger! It reminded me that love shines for ALL ages and the idea formed for my card!

I used Mo's Bride and Groom image like an old photograph on the wall to remind us that these gorgeous ol' folks were once young - and though time had stooped their backs - their love still "Glitters" around them! There are dazzling diamonds smothering the frames, the numbers, the butterflies and the nestability label under the sentiment - it really does sparkle IRL. I was going to use gold glitter for their golden anniversary but it just looked a little "cheesy". But there is a gold chiffon bow nesting among the flowers.

Now to follow the glittery road to Dazzling Mina's blog and see what's sparkling over there. And if you love these images check them out at Mo's store - Jack and Ginger are HERE and the Bride and Groom are HERE.

xXx

Wednesday, June 16, 2010

More Winter Fun from Spesch Stamps

Today I'd like to show you another one of the Winter release images by Spesch Designer Stamps. This little cutie is Samantha - although I've coloured her up in Coraline colours here - LOL. I was trying to find some small buttons to go on teddy's eyes but I had to settle for adding buttonhole dots instead!

My DP is from Basic Grey - I love using stripes - they are sooo versatile as design features!

For more inspiration from the DT with the Winter release stamps check out the Spesch Stamps Blog.

xXx

Tuesday, June 15, 2010

Simply Betty Stamps Goes Digital - Release Day Blog Hop

THIS IS MY THIRD POST FOR THE DAY - MID MONTH IS A KILLER - LOL. SCROLL DOWN TO CHECK OUT MY SPESCH STAMPS WINTER RELEASE AND MY BURTONESQUE DOLLS CARDS.

As Betty would say - woot woot - it's release day for the digital DT Diva's over at Simply Betty Stamps and to celebrate the real life DT are having a hop - and somewhere along the hop someone who leaves a comment will win ALL of the DT Diva images - yippeee - I love being a part of give-aways - LOL.

You should have hopped here from Betty's Blog. And here you get to see DT Diva Alicia and her die cut machine. I've done Alicia in bright young, funky and fresh colours - and made sure she doesn't forget anything as she heads out the door to her crop - LOL.

Now it's time to hop on over and see what marvels await at Jen's Blog.

xXx

Burtonesque Dolls Challenge #7 - A Burtonesque Birthday with The Lil Lolitas

THIS IS MY SECOND POST FOR TODAY - ANOTHER BUSY TUESDAY! PLEASE SCROLL DOWN FOR MY SPESCH STAMPS WINTER RELEASE.

This week at The Burtonesque Dolls we are lucky to be sponsored by the fabulous Kellie from Tickled Pink Stamps and her Lil Lolita range. You know these gals are near and dear to me - and wait until you see the NEW range - coming soon! But in the meantime one lucky entry this week has a chance to win rubber stamps of Lylah, Evie and Willow - wooohoooooo - what are you waiting for - go create - LOL!

Your challenge this week is to come up with a Burtonesque style birthday card. Here I've used Lil Lolita Lylah and some fabulous Magnolia DP and some cobweb ribbon - all available from Tickled Pink Stamps. Lylah has such a marvellous face - she can look all sweetness itself - or with a change of colour she can turn from sweetie to creepy.

Don't forget to check out the rest of the inspiration from the Dolls HERE.

xXx

Spesch Stamps Celebrates Winter

Well it's well and truly Winter here in Melbourne - the nights are spent enjoying a nice bowl of soup while snuggled up under a blanket. At the start on June Spesch Stamps celebrated Summer for those of our friends in the Northern Hemisphere - but now it's our turn - LOL.

The Winter release from Spesch Designer Stamps is available today - this cutie is called Dana - and she actually comes with a bag of marshmallows too! Here I have her sitting on a wind swirl in front of some DP from October Afternoon! If I'd done Dana as a blonde she could be my daughter - Sarah can often be found snuggling up in a scarf with her hands wrapped around a warm cup of tea!

I'll be back tomorrow with another card featuring a different Winter image from Spesch Stamps and in the meantime you can see some other wonderful inspiration from the DT on the Spesch Stamps Blog HERE.

Stay Warm

xXx

Monday, June 14, 2010

Simply Betty Stamps Goes Digital - Preview Day 2

Today is Day 2 of our Simply Betty Stamps DT Diva previews and I'd like to introduce you to DT Diva Lisa. Now I've never met the real Lisa - but through the wonders of the internet we've become great friends - and I happen to know green is one of her favourite colours too. I would love to imagine her strolling down the street with her stylish pearls and sunnies on - as she heads off to a crop with friends after stopping at a sidewalk cafe for a latte first, or maybe pops into her local craft shop on the way - LOL. This DP from Websters has helped bring that little story to life here. There are diamond stickles around the edges because Lisa is a true diamond - a rare find.

Now don't forget all the DT Divas are being showcased over at the Simply Betty Stamps Blog and they will be available for sale TOMORROW at the store HERE.

And don't forget to hop by tomorrow for our release day blog hop - where you'll have a chance to win all of these beauties!

xXx

Sunday, June 13, 2010

Simply Betty Stamps Goes Digital - Day One Preview

Wooohooo - today is Day One of previews for Simply Betty Stamps and the new line of digital images - the Design Team Divas! This range will be up for sale from June 15th - but in the meantime you get to be inspired by the SBS DT themselves - check out all of today's preview cards at the Simply Betty Stamps Blog HERE.

Needless to say Betty's DT were over the moon when she presented each of us with out own digi Diva - this one is DT Diva Debbie - yay - my 5 seconds of fame - LOL! Betty obviously has never met me IRL - I certainly have never had a figure like this gal - though I do in my dreams ; ) I told Betty I should print her out life size and take HER clothes shopping - it would be soooo much easier that fitting my rounded shape with it's short legs - LOL. I was deeply touched to have my own Diva image though - and have tried to put some of MY style into my card. My favourite colour - green. I also love natural colours and this Basic Grey DP is soooo me! And I love my flowers - with a touch of bling to keep me young. And look - I have Copics clutched ready to go in my hand - LOL.

I'll be back tomorrow with my interpretation of another one of the Divas - and don't forget to check out what the other Divas have done with THEIR digis!

xXx

Friday, June 11, 2010

A New Tickled Pink DT Challenge - B&W Image


It's another week so it's time for another challenge by Kellie for her DT - she likes to keep our mojo flowing - LOL. This week she's asked us to use a B&W image with coloured DPs. It doesn't look like my papers are too coloured - and I've snuck some colour into Willow's eyes, cheeks and flowers - but am sure Kellie won't get too mad at me!

Willow is of course one of the FABULOUS Lil Lolita's from Tickled Pink Stamps own range. Just be aware the first shipment of Willow has sold out - but there will be more on their way soon! Her 4 fabulous sisters are all available though! The ribbon and pearls also came from Tickled Pink Stamps.

The DP is from October Afternoon's Thrift Shop - I bought this at Kristy's Delicious Papercrafting store. I used my gorgeous Tim Holtz flourish die and covered it with some stickles - the photo just doesn't do it justice! There are stickles among the bunch of flowers too.

Wishing you all a little sparkle in your life!

xXx

Thursday, June 10, 2010

Merging Digital Images Using Paint.NET


I'd been trying to figure out how to merge digital images when I saw the fabulous tutorial that's linked on Mo Manning's blog - Digital Pencil Too - but unfortunately I just couldn't get it to work for me as I don't have Photoshop. What I DO have is a free software called Paint.NET - one of the IT guys at work recommended it to me and it's very user friendly. Using the other tutorial as a guide I finally worked out a way of merging using Paint.NET. Here it is for you to try... If you don't have Paint.NET you can google it and download it for free. I haven't given you a link as it may change as updates become available. Note - this is NOT the same software as Microsoft Paint! I checked with Mo and she was happy for me to use her images in my tutorial - THANX MO!

It's pretty easy but be aware I've taken LOTS of step by step pictures to make it as clear as possible for  you - so you may want to grab a cuppa before you start. Apologies for the photo quality in some of the pictures - it's not easy to take decent shots of my laptop screen - and I never claimed to be a photographer - LOL.

Also - you can click on individual pictures to get a close-up if you need too!
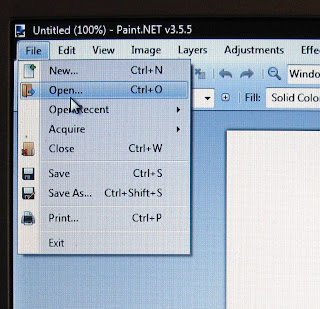

The first step is to open up the program and click on "File" to get the drop down menu. Select "Open"

Choose the image file you want to use - make sure it's the one that will the back image of your merged images - this is important as the second image will be sitting over the top of this one - so plan ahead! Click on the image you've chosen and then press "Open"

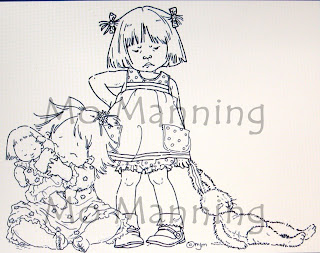
I've chosen the adorable Mariko is Mad - you can find her HERE in Mo's store.

Once she's open you can see she takes up all the space in her "box" - so we need to make some room for the next image.

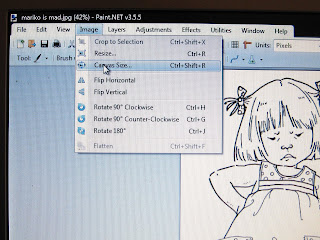
In the top menu click on "Image" to get the drop down menu and then click on "Canvas Size".

This screen will open up and you can use the placement boxes at the bottom to determine the position on the page of your first image.You will also need to make the picture area larger - you can do this by changing the width and height under the pixel size. For this example my next image won't be taller than Mariko so I'm just going to make the canvas size wider. Don't worry if it looks too big - you can crop your final picture down later. I've decided I want her placed on the bottom right of the page and I doubled the width.

After pressing "OK" my new picture space looks like this. Before taking the next step make sure everything looks OK to move on - because once you move onto the next step you can't change anything done up to now without re-starting. But if it's not right you can still change the canvas size and positioning before moving on.

Now to add in my next image!

I've chosen one of the super cute "I Love It" images to combine with Mariko this time - you can find her HERE in Mo's store.

To add her in you go "Layers" in the menu and select "Import from File" from the drop down menu.

Then find, select and open the file you want.

After you press "Open" she'll appear on your screen somewhere. You may find your second image is out of proportion to your original image - you can re size it by placing your cursor on the corner of the image box and shrinking or enlarging it to fit.

Then just drag your new image into place. You'll notice the box from the second image obscures some of the original image - this is fine - we'll be fixing that up next! Make sure she's exactly where you want her and she's the right size because once you go on to the next step you can't go backwards - this is a pain sometimes but I can't complain as the software was free!

Go to the "Tools" menu and select "Eraser" from the drop down menu. It will come up fairly small but you can change the size using the "Brush Width" option - located to the right  of "Tools" in the menu bar. I use a large brush width to start with and then a small one when it comes to the areas where the images are close together.

Start erasing the "box" around your second image to make the lines from your first image re-appear.

You can also zoom in as you get closer to where the images overlap so you can see what you're doing better - just use the "+" magnifying glass in the menu bar.

Don't worry if you erase too much in one spot - you can always use the "undo" button to go back a step or two in your erasing.

Once you're happy with your erasing you're ready to save your image. Go to "File" on your menu and select "Save As".

Select a name for your file and then use the drop down menu to save your file as a JPEG file - I need to save as a JPEG as I crop my finished image in Windows Photo Gallery - but you can save in whatever format you like!

Just a note here that has nothing to do with this tutorial - I get some files I need to convert to JPEG for some reason or another from another format, so I just open them in Paint.NET and use my "save as" to convert them to JPEGs!

Back to my tutorial - sorry for the unscheduled interruption - LOL.

If you're saving as a JPEG this screen will pop up first. Just press OK.

Then you'll see this screen. You need to flatten the 2 images together into one.

Your next job is to crop the image down to remove the excess canvas - you can use whatever software you usually use for cropping. You can use Paint.NET too - just re-open your merged image into the software and draw a rectangle around what you want to save - using the "Rectangle Select" tool. Then go to "Image" and press on "Crop to Selection" in the drop down menu. Save your finished project.

Here they are among my other Mo files - ready to print out as per normal.


Aren't they cute together!!!
I hope you find this tutorial useful - please feel free to ask me if you have ANY questions!

xXx


Wednesday, June 9, 2010

Tickled Pink Stamps Monthly Challenge #2


This month Kellie has a wonderful sketch (inspired by Claudia Rosa) for everyone to play along with at Tickled Pink Stamps Monthly Challenges. AND as an added challenge you're asked to make a matching card and bookmark set. I've used the gorgeous Evie in soft muted tones for my set. It was really hard NOT to put flowers on the bookmark - but figured it might be hard to actually use in a book if it was too fat - LOL. And if you want MORE inspiration you really need to check out the AMAZING work the DT have come up with - each one soo different and sooo fabulous!
The DP is from Websters and I got it from Kristy's Delicious Papercrafting Store, and of course Evie is from the Home of the Lil Lolitas - Tickled Pink Stamps. I really wish you could see this IRL - I have stickles around a lot of the edges and it sparkles beautifully when it catches the light.

I hope you can come along and join us this month - there's a FABULOUS prize on offer. You do need to use a stamp from any company that is stocked by Tickled Pink Stamps - even if you didn't purchase it there - you can check out the store HERE to see what stamp companies are eligible.

xXx

Tuesday, June 8, 2010

Winner of My Mo's Blog Candy

Just a quick post to say CONGRATULATIONS........

MICHELE ROOS

- you are the winner of the Mo's Gift Voucher. Please email me at rdpam@hotmail.com and I'll organise getting it to you! Thanx to everyone who left a comment - and for all those favourites I need to check out again!

xXx

Burtonesque Dolls Challenge #6 - Final Cut...And Shave


This week's challenge over at The Burtonesque Dolls is called "Final Cut...And Shave" You need to create a card/project inspired by the movie Sweeney Todd and use decorative scissors or paper distressing tools somewhere on your creation. Our sponsor this week is Simply Betty Stamps with the new range of My Kids Emo World stamps - perfect for Burtonesque and they are INSTORE now - woohooo.

I've used Miller here - and given him a Sweeney Todd hair dye job - LOL.

I used the photo from the DVD as my inspiration for the colour scheme - B&W with slashes of red. The scaredy cat and barber sign were cut using my craft robo. the DP is from My Mind's Eye and I was really lucky to find a shaving cream charm on my travels last week - I was actually looking for a scissor charm but they had sold out! Now I'm not sure who - if anyone - I'll be giving this card to but I must admit it was worth the effort just for the fun I had! It's nice to explore my dark side at times - LOL.

Don't forget to pop over to The Burtonesque Dolls Blog HERE and see what the other Dolls have done to inspire you to explore your dark side!

xXx
A Royal Birthday Blog Hop


Today is a very special day for one of my wonderful crafting friends - it's Kristy Young's Birthday - wooohooooo!!! Now Kristy was nicknamed "Princess" by Waffle herself - Kellie Winnell - so Kellie organised a group of us to give Kristy the royal treatment and give her
A SURPRISE ROYAL BIRTHDAY BLOG HOP!!!


To start at the very beginning of the hop you need to visit Kellie's Blog HERE.

We have a theme for the hop too - can you guess what it it  - LOL. Yup the theme is PRINCESS! As soon as I saw this new release cutie called Everyday Princess from Tiddly Inks I knew I wanted to use her - she reminds me of Kristy - fun and funky with a royal edge. I also found this amazing castle cake picture I thought would be perfect for Kristy - it would be just toooo good to eat - LOL!
Kristy has also started adding a quote to the end of some of her posts - so I found a couple I thought would be appropriate for today...as well as some party balloons to set the mood.

Larry Lorenzoni - Birthdays are good for you. Statistics show that the people who have the most live the longest.

Anonymous - A well-adjusted woman is one who not only knows what she wants for her birthday, but even knows what she's going to exchange it for.

The next stop on the hop is the Amazing Debra James - so hope you can hop along and enjoy the fun of our Royal Birthday Hop!

xXx