Pages

Wednesday, November 30, 2011

Pre- Made Envelope Boxes


Are you fed up making box's or envelope box's for your cards...... well not any longer.............

I don't know about you but I hate having to spend time measuring out, cutting and scoring envelope boxes to fit embellished cards into. Soooooooooo, drum roll............ My fabulous friend Tracey Payne has had some made.  Yayyyyy,  Whoppeeeee, so exciting.......

They are professionally cut and scored ready for your glue/tape and are an absolute godsend.  So if you're interested please email Tracey at  t.payne@homecall.co.uk for a quote.  She's happy to ship worldwide no problem.

To help spread the word she is offering a pack of 25 as candy.  This is what you need to do:-

1. Write a post on your blog and link back to her post HERE
2. Add the picture to your sidebar and link to her post
3. Add your name in Mr Linky in the post

A winner will be drawnon January 2nd.

Tracey would also like to know if any of you would be interested in boxes to fit the cards made using the Martha Stewart Punch Around the Page punch.


Friday, November 25, 2011

Make It Colourful - Colour White


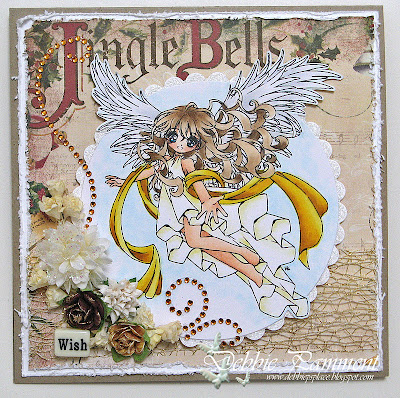
Our new challenge is up over at Make It Colourful and we are asking you to Colour White. Now this can mean different things - I believe one of my teamies is colouring white onto a dark background for example! For me it means subtle shadows giving the illusion of depth without adding colour. Here I've used Angelica in Flight by Make it Crafty and I've given her white dress some golden shadows and her white wings some depth using cool greys. The pop of colour from her scarf helps to make the more muted tones appear softer too.

Check out what the rest of the DT have created to inspire you in our gallery HERE.

Copics used - R20, R11, E11, E00, E000, YR23, Y19, Y11, Y08, Y00, Y000, Y0000, B05, B0000, C1, C0, E50, E41, E42, E43, E44


Thursday, November 24, 2011

Vintage Christmas with Mo


When I saw Mo's Ragged Santa  I thought he would work well with a "vintage" look so I set out colouring him in deep sepia tones. I wanted to keep the Christmas fun though so added in touches of red, green and gold - and of course some festive sparkle! To continue the aged look I used the cracked glass techniques over my image - I love the look this gives and it's well worth the effort. There are plenty of tutorials online to help you with this technique - you can check one out HERE by the fabulous Beate Johns - hope you give it a go sometime! I do wish I'd distressed the edges of my papers to compliment the aged look though - ah well - next time!

Copics used - E51, E50, E49, E29, E27, E25, E23, E11, E00, E000, R59, R46, R20, R14, G28, G24, G21, YR23, Y19, Y11, T4, T2, T0


Tuesday, November 22, 2011

Tickled Pink Stamps is sponsoring Bearly Mine Challenges


This week Tickled Pink Stamps is proud to be sponsoring Bearly Mine Challenges where they want to check out your "Favourite Things". Personally I found this a tough challenge - a card would look way to busy if it had ALL of my favourite things on it so I had to work out what I loved most. I've used the new Winter digi release Tickled Winter Snowflake Fairy Nadine and my favourite things - snowflakes, dies, fairies, glitter, mesh ribbon & flowers

I wish you could see this shimmer IRL - the Bo Bunny DP is glittered, the mesh ribbon sparkles and I've used glitter on Nadine - it looks sooooo cool and icy.

Copics used - R20, R11, E11, E00, E000, E50, E31, B05, B02, B00, B000, B0000, C2, C0, C00, Y11, Y00

xXx

Monday, November 21, 2011

Reversing Stamps

I had a couple of questions about how to use a reversing stamp and what one is after mentioning one in my previous post. Rubber stamps come in one size and face only one way when stamped out. This is unlike digi stamps which are easy to manipulate to suit your layout. You can't re-size rubber stamps without copyright infringements but you CAN "flip" them using a reversing stamp - which is basically a blank wood mounted rubber stamp you stamp your image onto and then use this to re-stamp your image onto cardstock ready to colour. Here are some pictures which I hope explains everything for you....but note - you have to stamp your image off fairly quickly so the ink doesn't dry out.

Image used here is by Magnolia and is an exclusive release for Shopbron called Koala Cuddles Tilda. I've used Momento Black ink and X-Press it blending paper.

My reversing stamp is a Judi Kins Solid Palette Rectangle - Large
EDIT - you can find these stamps in different shapes and sizes - HERE is a link to the one I have!


Sunday, November 20, 2011

Magnolia Down Under Challenge #123


This week over at Magnolia Down Under Challenges we have a sketch for you and I'm going to be very excited to check out all the entries as the sketch was designed by yours truly! We are also welcoming back TILDA'S TOWN as our sponsor.
Since the challenge was a sketch I created my card BEFORE chosing my image - hmmmmm - not sure WHY I did that because a lot of my Tilda's didn't fit in the space I had created! You may notice this cutie (Tilda with small gift) is mirrored - I had to use my reverse stamp to stamp her out facing this way so she would slot into my space - looks like it was made for her doesn't it - LOL.

Now don't forget to check out the rest of my teamies AMAZING work on our BLOG - and I'd LOVE to see what you can do my my sketch so give it a go!

Copics used - R89, R85, R83, R20, R11, E44, E43, E42, E41, E40, E11, E00, E000, T4, T2, T0, BG78, BG72, BG53, BG10

xXx

Friday, November 18, 2011

A Bit of La La Land Fun


Yay I found some time to play! These days I only seem to find time to get my DT projects done but I've missed colouring up the La La Land Crafts cuties and when I saw the limited digi release for this snowboarding Luka I just HAD to play along - and I needed some more boy's cards in my stash - LOL.

I asked my daughter what colour her BF's ski suit was and she told me yellow and black which is how this colour combo came about. It may almost be Summer here but I don't mind a bit of snowy fun to cool things down - LOL.

Copics used - R20, R11, E11, E00, E000, R83, E53, E39, E33, YR23, Y19, Y11, Y08, 100, W7, W5, W3, W2, W1, W00

xXx 

Thursday, November 17, 2011

Mo's Dream Team Blog Hop


The third Thursday in the month means it's Mo's Dream Team blog hop time and the theme this month is "Make a Gift" and was chosen by the lovely Lori who is our host this month and the start of the hop. If you're already hopping you should have arrived here from the amazing Alice's blog.

I've created a gift box and have popped some jewellery and chocolates inside it for a little Christmas gift. I did buy some Ferrero Rocher chocolates to pop in but they were a bit too tall for the "shelves" so  I had to go shopping again and bought some Dove chocolates and made little dividers for them. In the meantime I managed to console myself with my bonus treat - LOL.

The box was made using THIS tutorial by Heather Perreaux I found - it's called a "Secret Box". I used Mo's gorgeous Lil Elf Pipa on the top - these guys are great at ANY size and since this box is only 3"x3" there wasn't a lot of space to play with.

Now it's time to hop on along to marvellous Mina's blog. Here's the hop list in case you get lost along the way...

LoriGretha, KerttuJaneJulieDebbie 4000HeidyAlice, Debbie {me}, MinaPopsJak

And if you're after more fabulous Mo inspiration from the Dream Team don't forget to check out the regular postings on our DT BLOG.

Copics used - R20, R11, E11, E00, E000, N3, N1, YR23, Y19, Y11, BG15, BG13, BG11, E51, E50, E18, E13, R89, R85, R83, R46, G29, G28, G24, G21 - note I coloured Pipa in the BG's and then thought she needed to be "greener" so went over the top of all the BG with G21. Don't be afraid to experiment with your copics.

xXx

Wednesday, November 16, 2011

New Sketch Challenge from The Craft's Meow


It's time for another monthly sketch challenge over at The Craft's Meow and this month I'm proud to say the sketch is mine. To be in with a chance you need to use a TCM stamp set and we must be able to see the sketch in there somewhere. You are free to flip it or turn it as you like! You have until December 14th at 9:00 pm Pacific to link your card on our blog HERE. There's a TCM stamp set of choice going to one lucky entrant.

I've used the gorgeous Vintage Ornament set and used my sparkly gold embossing powder to stamp the ornament. I layered up 2 with the centre cut out for a 3D effect. Then I popped a cute chipboard reindeer in the middle and blinged his nose up - I think everyone loves Rudolph - LOL.
xXx


Tuesday, November 15, 2011

Tickled Pink Stamps Preview - Lil Lolita Shopping Ivy


It's Day 2 of our previews for the mini DIGI ONLY Winter/Christmas release from Tickled Pink Stamps and today I'd like you to meet Lil Lolita Shopping Ivy. She's definately one for Christmas cards and fabulous for those of use with a warmer Christmas in her short sleeves and skirt - and don't you just LOVE the long socks - LOL.

Pop on over to OUR BLOG to see more amazing creations with this cutie and comment for a chance to win! And don't forget to pop in there over the next 2 days for the rest of the previews - release day for these is November 18th.

Copics used - R20, R11, E11, E00, E000, E44, E43, E42, E41, E40, Y19, Y00, Y000, R39, R29, R27, R24, 100, C8, C6, C5, C4, C2, C0, G28, G07, G05, G0000

xXx

Monday, November 14, 2011

Tickled Pink Stamps Preview - Winter Little Lolita Evie


Yay it's time to preview some new images from Tickled Pink Stamps. This is a DIGITAL ONLY release with a mix of 4 gorgeous Winter/Christmas themed stamps illustrated by the talented Christina Dee. These images will be on sale on the 18th November.

Today's cutie is Winter Little Lolita Evie - she could be used for Christmas OR on a Winter based card as I've done here. I found these cute tags at a recent craft show and went a bit crazy with the snow white flower soft.

If you want a chance to win this cutie for your very own then leave a comment on OUR BLOG and you are IN for a chance to win, and also a chance to WIN the entire collection. And while there don't forget to check out what the rest of the Pink Ladies have come up with - I'm sooo proud to work with such a talented bunch of crafters.

Copics used - R20, R11, E11, E00, E000, B99, B97, B95, B93, B91, B05, B000, B0000, E50, E49, E37, E33, E31, C7, C5, C2, C1, C0

xXx

Friday, November 11, 2011

Make It Colourful - Lantern/Candle light Source


It's time for a new challenge over at Make It Colourful  and we're asking you to colour a scene using a lamp or candle as a light source. I decided on taking a break from Christmas cards and chose to use Make it Crafty's Rise and Shine bedroom scene because it had a lamp on the bedside table. I did crop the lamp out and then pop it back in a bit larger as it was my feature light source. I added Sitting Annalise onto the bed and  tried to add shadows and highlights accordingly. I've also used the Swirly Corners chipboard  from Make it Crafty.

Now don't forget to check out the amazing inspiration from the rest of my teamies over in The Gallery and try this out for yourself. I admit I found it tough but I got there in the end so I hope you'll give it a go too!

xXx

Yet ANOTHER Mo Candle


I know I know - you're probably thinking all I can do at the moment with Mo Manning's images is candles - LOL. But I do have an excuse for doing another one! I was asked if I could make a purple fairy and butterfly candle - she just wants it as a decoration so I figured I'd pop some little 3D butterflies on instead of stamped ones! But remember to REMOVE flammable objects from your candle if you decide to LIGHT IT for obvious safety reasons - and tell anyone you may make a candle for the same! 

Anyhow, today I've used one of Mo's newer fairies - this one is Teen Fairy Mia and I just LOVE her and her adorable 'sister' Teen Fairy Pia. I did have a small problem with this candle - but my friend loved it and told me not to bother re-doing it. You may notice the black lines on Mia's wings are smudged! I don't think I embedded the image deep enough into the wax and the ink ran when I popped the stickles on - grrrrrrrrrrr. But with all the sparkle it's not too obvious - I hope!

Next time I play with Mo's images I PROMISE you'll see something a little different - am already working on it so I KNOW I speak the truth - LOL.

Copics used - V17, V15, V12, V01, B05, R89, R20, E19, E17, E15, E13, E11, E00, E000, G24, G17, YR07, YR04, YR00, YR000

xXx

Wednesday, November 9, 2011

Back To School I Go with Ingvild Bolme

Last night I had the honour of attending a class held in Melbourne by Norwegian Scrapping MASTER Ingvild Bolme. Not only is Ingvild an amazing artist and designer but she is the sweetest lady too - generous of her time and ideas. Thanx to my LSS Scrappy Hollow for hosting the event and the supper afterwards too.


This is the layout we created - I've used a photo of my gorgeous daughter Sarah and I had distressed it a little using Photoscape before I went. I don't do much scrapbooking but I thoroughly enjoyed the class and the ideas and I think I may dabble some more! It was also a LOT of fun trying out Ingvild's fabulous tools and Prima's gorgeous products.


And here's a picture of Ingvild and me - taken at close to 11pm after a long evening - see how generous this lady is with her time! AND she had a 6am flight to catch the next day!

xXx

Sunday, November 6, 2011

Tickled Pink Stamps is Sponsoring Papaer Sundaes Challenges


This week Tickled Pink Stamps is proudly sponsoring Paper Sundaes Challenges and they've asked us to be "Rectangular". My card started off as a square but I've created a rectangular look by using my Tim Holtz snow flurry die along the side edge. I've doused this in flower soft and glitter to add some texture. 

The beautiful Lil Vintage Christmas Ivy came out to play on my card today - along with the FABULOUS Vintage Christmas sentiments that have arrived instore and are ready to ship!

Copics used - E57, E55, E53, E51, E50, E11, E00. E000, C4, C2, C1, C00, Y19, Y15, Y11, Y0000, YR23, G28, G17, B93, B21, B02, B00, B0000, R35, R20, R11

xXx

Magnolia Down Under Challenge #121


This week over at Magnolia Down Under Challenges we have something I'm sure many of you will enjoy - we're asking you to use "Charms and Bling" - now isn't that everyone's DREAM challenge - LOL. And we're welcoming back out regular sponsor SHOPBRON this week. 

Although this appears an easy challenge I needed some inspiration to get started - so I went off in search of a sketch. I didn't end up finding a sketch to use but what I did find was a fun colour challenge from Colour Create - Turquoise, Deep Pink and Ivory with the optional extra of Glitter, and here's the inspiration picture to go with their challenge...


My DP is from Magnolia and the check is actually called "turquoise check" so I'm hoping that passes - LOL.

And don't forget to head over to the MDUC Blog to check out the rest of the AMAZING "Charms and Bling" inspiration from my fabulous teamies.

Copics used - Y11, Y08, Y00, Y000, BG72, BG53, E18, E17, E15, E13, E11, E00, E000, RV63, RV55, RV10, RV000, R20, R11

xXx

Thursday, November 3, 2011

Another Mo Candle


Well I told you I'd be making more candles and here's another one - check out my first one HERE. Wouldn't they make GREAT Christmas presents. And I'm really excited to have figured out you can add some bling with stickles after adding your image to the candle, it doesn't slide of the waxy surface - gotta love Christmas Bling.

Today I've popped one of Mo's adorable elves onto a candle - this one is Lil Elf Kin. The tutorial for making these is HERE - super easy and super FUN! Now just a word of warning - make sure you attach the tissue paper to the SIDES of your "carrier" sheet and not just at the bottom - mine fed through unevenly and some of the tissue broke off and clogged my printer - hubby was NOT happy thinking I'd broken it!!!! But with some patience I managed to un-wedge the offending piece AND convince hubby to let me try it again - LOL.

Don't forget to check out Mo's Dream Team Blog for regular inspiration from my amazing teamies!

Copics used - E18, E15, E13, E11, E08, E00, E000, R89, R29, R20, YR23, Y19, Y08, B97, B93, B21, T2, T0, YG67, YG61, YG03, YG0000 

xXx

Tuesday, November 1, 2011

The Craft's Meow November Release Blog Hop


YAY I bet you're all excited that it's RELEASE DAY for these amazing sets we've been previewing form The Craft's Meow. We are celebrating with a blog hop and you should have started at The Craft's Meow Store Blog - and you'll find ALL the links there if you get lost along the way!

If you ARE already hopping you should have arrived here from amazing Amy's Blog 

The Craft's Meow will be giving away a set of the SEVEN sets being released today to one lucky person who leaves a comment on the store blog hop post. They'll have until 9:00 pm Pacific on Thursday November 3rd to make the rounds and leave a comment for a chance to win.


For my card I tried to incorporate as many of the fabulous new sets as I could into one scene - and don't they work well together! The cute owls are from Happy Hoo-Lidays, the sentiment is from Season't Greetings, the snowflakes are from Vintage Snowflakes and the presents are from The Merry Best.


Now it's time to hop on over to the talented Ivana's Blog 

Copics used - R89, R29, R05, R000, C6, C5, YR31, YR30, YR18, YR16, W3, W2, W1, W00, E18, E17, E15, E13, YG67, YG63, YG61, B000, B0000

xXx

The Emerald Faerie Garden Challenge #12 - Christmas Red


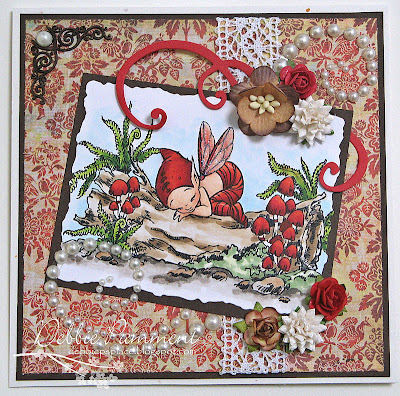
It's time for a new challenge at The Emerald Faerie Garden and we're asking you to use Christmas Red. I've used the super sweet Ashee and have taken him off his mushroom and onto a log on the forest floor. The fern log is from Make it Crafty.

We hope you start seeing red and come along and play with us - and don't forget to check out the amazing inspiration from our DT on our BLOG.

Copics used - R20, R11, E13, E11, E00, E000, R89, R29, R05, YG17, YG03, G28, G24, G21, G20, E44, E43, E42, E41, E40, E33, W7, W5, W3, W1, W00, B000, B0000

xXx