Pages

Showing posts with label Teddy Bo. Show all posts

Monday, February 4, 2019

Three Cards from Teddy Bo


I was so excited when Teddy Bo & Co returned at the start of the year and couldn't wait to start colouring up some of the new cuties. These guys are some of my all time favourite bear images. 

In all the excitement I forgot to post them here on my blog - so apologies for posting them all in one go!

The first one is TeddyBea_281. Don't you just LOVE that large draped heart?!?!!
Copics Used
E49, E44, E43, E42, E40, E15, E13, E11, R89, R27, R24, R21, R20, 100, W4, W2, W00, YG99, YG97, YG95, YG93, YG91, YR27, Y19, Y15, white gel pen


And this nursing cutie is TeddyBea_029
Copics Used
E44, E43, E42, E41, E37, E33, E30, R27, R24, R22, R20, C10, C8, C6, C4, C2, C0, C00, B06, B04, Y28, Y26, Y21


And lastly this one is Little Drummer Boy Bear.
Copics Used 
E99, E97, E44, E43, E42, E40, E18, E15, E13, R20, YR65, YG99, YG97, YG95, YG93, YG91, 100, C6, C4, C2

Saturday, November 4, 2017

Challenge me a Christmas Card - with Michelle Lupton & Friends


My friend Michelle Lupton is running a Christmas card challenge with friends and today I am playing along with her. Our challenge today is "Deck the Halls", you can check out Michelle's card for the challenge HERE.


I chose this gorgeous image from Teddy Bo to use because to me "decking the halls" is all about decorating the house up for Santa's visit, so I felt this image fit the bill. I also added some "boughs of holly"to the top corner as per the line in the Christmas carol. Sadly the Teddy Bo shop has shut down but I love the images I have and will keep playing with them.


Just for a bit of fun I also decided to experiment with my new chibitronics LED light up system to add a "glow" in the fireplace. The large sparklet acts as the switch to light up the LED when it's pressed.

Copics Used
Bear - R20, E49, E44, E43, E41
Clothes - C6, C4, C1, R29, R27, R24, R22, R21 
Carrots - G07, G02, E09, YR09, YR02
Plate of Treats - E18, E13, Y21
Fireplace - G07, T8, T4 , T2, 100, E18, E15, E13
Fire on the Vellum - R59, R29, R27, YR16, YR09, Y9, Y06
Background - E43, E42, E40, B000, B0000
Star Decoration - Gold paint pen, white and red glitter gel pan, 100

Friday, August 25, 2017

Winter Playtime


It's time for my most recent make for August using the gorgeous new Teddy Bo images - these are available in amazing value bundles, or as individuals! 

These guys have so much FUN together - don't you wish you were them sometimes LOL. I hoope that poor snowman's twiggy arms are stronger than they look!!!

Copics Used
Snowman - B000, B0000, E59, G29, 100, C6, C4, C3, C2, C0, R29, R27, R24, R22, R21
Teddy Bea Fur - R20, E77, E35, E33, E11
Teddy Bo Fur - R20, E49, E44, E43, E42, E41
Bear's Clothes - R29, R27, R24, R22, R21, C8, C6, C4, C3, C2, C0, B69, B18, B16, B12, G46, G29, YG17, YG05, YG01

Friday, August 18, 2017

Winter Cuddles


I had so much fun creating this wintery scene using the gorgeous new Teddy Bo images for August, especially as I am sitting here in snuggled up against the cold outside. These images are from "The Bears" collection and are available in amazing value bundles, or as individual images.

The dies I've used are all from La-La Land Crafts and the were the perfect choice to set the scene for my cuddling pair

Copics Used
Teddy Bo - R20, E49, E44, E43, E41
Bo's Clothes - B39, B45, B41, YR24, Y19, Y06
Teddy Bea - R20, E35, E33, E11, Y21
Bea's Clothes - C4, C2, C00, R89, R29, R24, R05, YR24, Y19, Y06, C4, C2
Wall & Garden - E79, E39, E35, E31, E30, G28, G24, W5, W2, YR24, Y19, R89, R29, R05, C3 
Cushion - B45, B41, B39, YR24, Y19, Y06

Friday, August 11, 2017

Time for a Pampering


Here's my latest make for August using the gorgeous new Teddy Bo images - these are available in amazing value bundles, or as individual images. 

I just love this cutie - and who else can relate to the sentiment - LOL. Taking time out for a luxurious bath just never seems to happen, something always seems to crop up. But we need to make time for ourselves and the little luxuries in life.

Copics Used
Molly - RV85, RV23, RV21, RV10, C3, C2, W1
Towels - E13, E11, E00, E000
Bathtub - C3, C1
Steps - E37, E35, E31
Water - B01

Saturday, August 5, 2017

Teddy Bo and Friend


It's time for my first make for August using the gorgeous new Teddy Bo images - these are available in amazing value bundles, or as individuals! 

I just love this pairing of these 2 friends once again. The little turtle is so cute, even with his back to us, but it looks like he's given Teddy Bo a little surprise - I wonder what they are talking about. My chipboard sentiment didn't photograph well, it's winter here and the light is never great - but it's been coated with a deep red glossy foil - it looks fabulous with the other reds and added such a wonderful shine to my project.

Copics Used
Teddy Bo - R20, R24, E79, E37, E35, E31
Turtle - YG99, YG97, YG95, YG91
Clothes - C6, C3, C1, R39, R37, R35, R32

Tuesday, July 25, 2017

Oli's Banner from Teddy Bo


I just love this little guy holding up the banner - and I love the fact that you can personalise the banner to suit the occasion or the recipient, I've used a mini chipboard alpha here. This adorable image is from Teddy Bo and is from the Oli and Molly July Bundle but will be available as a single in August. 

Copics Used
Oli - B37, B34, B32, B000, R01
Hat - C4, C2, C00
Banner - C4, C2, C00, YG17, Y18, V05, R29
Balloons - YG13, YG00, V05, V01, R24, R21, Y18, Y04
Ground - E43, E41, E40

Wednesday, July 19, 2017

Teddy Bo's Beach Molly


Luckily for many of my friends it's Summertime and they are out at enjoying the beaches and pools, maybe taking a picnic with them. With it being mid Winter here I can only dream of joining them - or colouring up some Summertime fun like I have done here. This adorable image is from Teddy Bo and is from the Oli and Molly July Bundle but will be available as a single in August. 

Copics Used
Skin - W5, W3, W1, W00, R20, R11
 Nail - BG10, BG02, BG01, Clear glaze pen
Clothes - V09, V06, V05, V01, BG05, BG02, BG01 
Basket - Y19, Y18, Y11, BG02, V05, White gel pen

Saturday, July 15, 2017

The Chibis from Teddy Bo


When Gayle from Teddy Bo introduced us to the Chibies I have to say my heart melted just a little. Aren't they just too toooo adorable?!?!?!?! I just HAD to print these guys off and colour them up. And there may just be another one printed out sitting next to my Copics. 

Check out all of the images in this group - remember they are now available as singles as it's July.

Image may contain: text

Copics Used
Bo - R11, R01, E79, E39, E37, E35, E31, E30
Bo's Clothes - C10, C7, C4, C2, R39, R37, R35, R32
Turtle - YG99, YG97, YG95, YG93, YG91, YG17, YG13, YG01, G19
Turtle Hat - R39, R37, R35, R32
Background - B0000, G24, G21, E43, E42, E40

Tuesday, July 11, 2017

Anyone for Tennis?? PLUS a Fur Colouring Tutorial


July is the month for the Wimbledon Grand Slam tennis tournament so of course Teddy Bo has to practice, practice, practice. This adorable image is from Teddy Bo and is from the July Bundle but will be available as a single in August. I'm a bit concerned he's playing on a court with a chicken wire net, AND he's broken his tennis racquet - but at least he looks the part and maybe, just maybe, he'll manage to win a point or 2.

I was also asked to do a quick tutorial for the DT over at Teddy Bo Towers on how to colour fluffy fur. Now I'm no expert, and my "fur" ends up being fairly course - but here is a step by step guide for you using one of my favourite combos - of course you can use ANY colour combo you wish. 


Copics Used
Fur - E49, E44, E43, E42, E40, R20
Clothes - Y19, Y08, Y02, C4, C2, C00
Raquet and Ball - 100, Y19, Y08, Y02, YR27

Wednesday, July 5, 2017

Paradise Found


Don't you just love these holiday images from Teddy Bo??? Teddy Bo sleeping in his chair is from the July Bundle but will be available as a single in August. The surfboards are from the My Cookie Stamps collection's Island Life series. I merged the 2 to create my beach scene. I hope you like it because I just LOVE these bears - they are just adorable....

Copics Used
Fur - E49, E44, E43, E42, E40, R20
Clothes - YG17, YG05, YG01, RV55, RV52, RV17
Surfboards - B06, B05, B04, B02, B01, B000, Y19, Y08, R29, R14, Y99, YG95, YG23, YG21, YG17
Chair - C4, C2 
Beach - Y26, Y21
Sea - BG34, BG32,BG10, BG01, White gel pen
Shadow - C2

Sunday, June 25, 2017

Teddy Bo Sherlock and Teddy Bea Holmes


Don't you just love these two super sleuths from Teddy Bo??? I decided to make a pair of matching notecards with them, keeping the layout and colour palette the same. These guys are in the June Bundles but will be available as singles in July.  

Copics Used
Teddy Bo Sherlock
Fur - YR23, YR20, E99, E97, R20
Clothes - YG99, YG97, YG95, YG93, YG91, YR23, C4, C00, Apricot gel pen
Pipe - E18, E15
Watch and Magnifier - Sakura clear glitter pen
Teddy Bea Holmes
Fur - YR23, YR20, E99, E97, R20
Clothes - YG99, YG97, YG95, YG93, YG91, C10, C4, C2, YR04, YR02, E95. E3, White gel pen
Magnifying Glass - C4, C2, Sakura clear glitter pen

Monday, June 19, 2017

Romance is in the Air at Teddy Towers

Image may contain: food

OH MY I just HAD to play with this image from Teddy Bo when I saw it. Don't you just love Teddy Bo and Teddy Bea dressing up and dancing together - soooo romantic. Of course these guys aren't the Beauty and the Beast, but I have nick-named them Bea Beauty and Teddy Bo Beast - or as the Teddy Bo DT have called them,  Bea and her horny bear Bo!

These guys are in the June Bundles but will be available as a single image in July. My card shape was cut using a silhouette store file.

Copics Used
Teddy Bea
Fur - R20, E33, E31, E30
Hair - E79, E37, E35, E33
Clothes - E99, E97, Y18, Y11, YR27, N5, N3, N1, N0
Teddy Bo
Fur - R20, E49, E44, E43, E42, E40
Hair - E43, E42, E40
Clothes -  E99, E97, Y18, Y11, YR27, B29, B24, B18, N7, N5, N3, N1, N0

Monday, June 12, 2017

Teddy Bo Exam Time

No automatic alt text available.
It's time to show you my next make for Teddy Bo and this image is perfect for what's going on at my house at the moment. My son is currently sitting his mid-year exams for uni and although I never see him falling asleep over his studies I know he is studying hard. My daughter also has a big exam coming up so GOOD LUCK to them both.

This guy is part of the June Bundles which are incredible value, but he will be available as a single in July.

BTW - you can tell who the stressed one in the house is at exam time - ME - can you see why??? Yup the scrabble tile paper is upside down, maybe I should study my design harder before glue is applied LOL

Copics Used
Teddy Bo - E59, E39, E35, E33, E31, R20
Bo's Clothes - YG67, YG63, YG61, B39, B28, B26, B24
Desk - 100, C6, E15, E13
Chair - 100, C10, C8, C6
Papers & Poster - E42, E41, E40
Background & Floor - C4, C3, C1, E17, E15, E13

Thursday, June 8, 2017

My Cookie Stamps from Teddy Bo


Not only does Teddy Bo have some gorgeous animal images with Teddy Bo, Teddy Bea, Oli and Molly, there are also some fabulous images under the My Cookie Stamps section. This is one of 2 in a set called Darcy's Book Set but I highly recommend you check out the others in the section.

Copics Used
Skin - E11, E04, E00, E000, R24, R20
Hair - E99, E97, YR23, YR20
Clothes - BG07, BG05, BG02, BG01, BG000
Book - E99, E97, YR23, C4, C2
Background - BG45, BG34, YR23, C2, C0

Tuesday, June 6, 2017

Changing Opacity and Merging Images to give the Illusion of Movement


After this images was published I had a few people ask me how I had created the image. It's simply a merged image but the trick is to change the opacity of some of the images and then colour them with a decreasing hints of colour. I use a free downloadable progarm called paint.NET.

Note - you can use a similar process to create your own watermarks for your projects - just type in the text and reduce the opacity.

I am a visual learner so have done step by step screen shots of the process so it's picture heavy. For my coloured image I worked on each character separately and then merged the 2 clusters - there are 2 layers for Teddy Bea and 3 for Molly.

So grab a coffee or your poison of choice and I'll show you how it's done.....


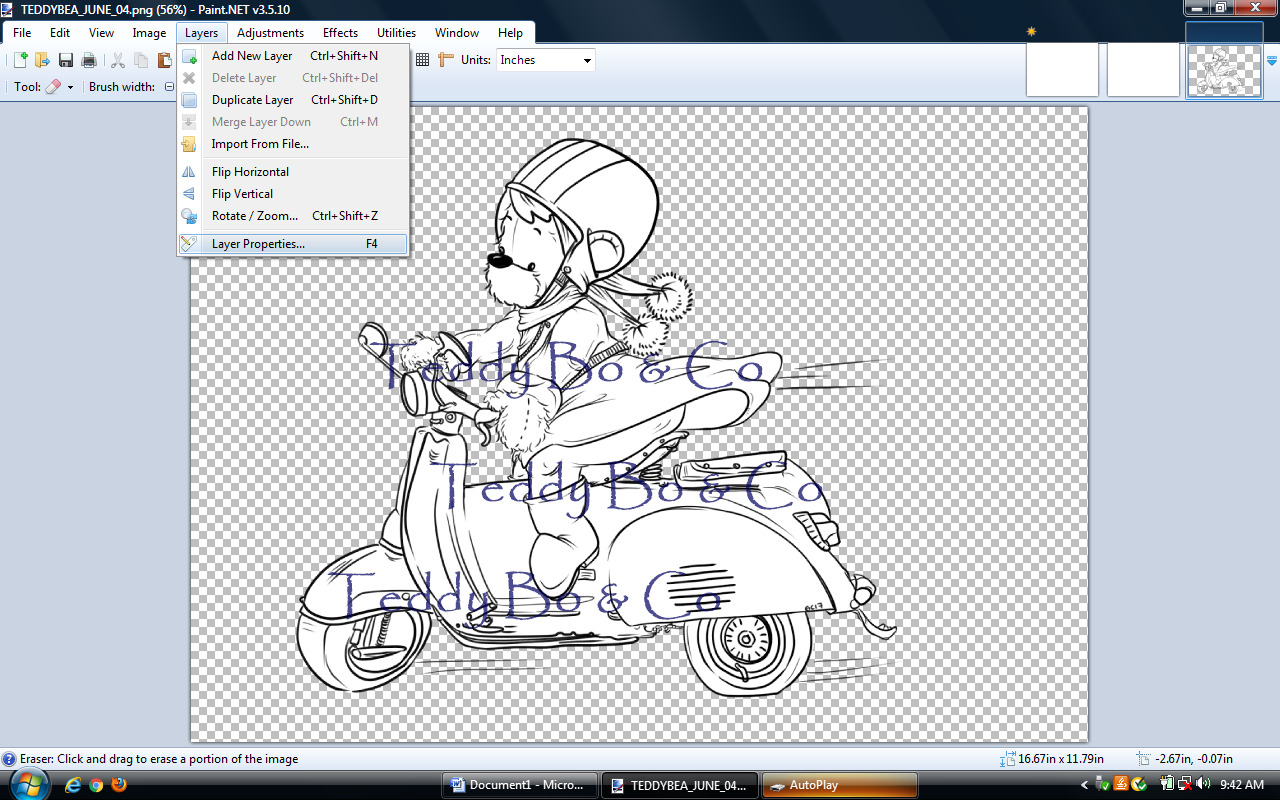
First of all import your image from the file. This time I'll do 3 layers of Teddy Bea. 

Then select "Layers" and  choose "Layer Properties" from the drop down menu.


Where you see "Opacity" change it to 100. My medium image was set to 100 and my lighter one was set to 75.


You'll see your image has lightened - make sure you save it under a different name from the original - I just add 100 or 75 to the end of it's name. Repeat to get your lightest image starting with the original.

When you merge you start with the one that will be furthest in the background and layer up. This means you start with your 75 opacity image. Once you have it uploaded you need to create more space to add your other images to. Select "Canvas Size" from the drop down menu under "Image".


Work out what the best position is for your the current image in relation to those you'll be adding and use the boxes to position it. Since we're adding images at the same height and to the left of the image I placed it in the lower right corner. I then changed to canvas width to accommodate the new layers we'll be adding. I always add more than I need because you can crop back at the end.


The white space on the left is your new canvas.


You can use the magic tool to create a clear background if you wish. Just select the tool and click on the white area which turns blue. Then simply hit the delete button.


To add a new image select "Import from File" from the drop down menu under layers and select the next image. 


I kept working on my image in it's original png format with the clear background - but for this tutorial I changed it to a jpeg which gave it a white background and makes it easier to see. Simply select "save as" jpeg under the save as menu if you wish to do this yourself. 

Note - it's easy to change any digital stamps from jpeg to png and vice versa using this method. 


So here we have our jpeg image with out 100 opacity image imported and postioned over the top. This is the only tricky part of the process! Because the images are opaque the layer below can be seen through it. It'takes a few minutes to fix this up but it's worth the trouble in the long run.

Unfortunately in paint.NET you can only work on the upper most layer so you need to use the back arrow and remove the 100 opacity image and revert the screen to the single layer. 


Select the eraser tool and change the brush width if needed so the eraser is larger. 


Erase the areas that are covered by the next layer but show through. You also erase the background which is why you the check shows up. Fill this in using the paint bucket tool in white.


Layer in your next image to check your progress and remove again if you still need to erase more. If you've erased too much keep pressing the back arrow when you get back to the image you are working on and it will replace what you deleted. Mine still needs more erased under where the top image's skirt sits


OK I'm happy with this - it's not perfect but the minor imperfections will become part of the whole "blur" of movement once the colour is added in.


Luckily the original image is strong enough to cover anything below it so layering this one on is simply a matter of importing it and moving it into place.


Time to crop it and save it. You will be asked to flatten it - this just means it glues the layers together to make one image. I usually save as either a jpeg or a png. 

I hope this makes sense to you. it always makes sense to you when you KNOW what you're doing...hopefully I have passed on enough information for you to know too, but I am happy to answer any questions if needed.

Happy merging...
xXx