"I just wanted to thank you for the free download it is amazing .....I was just showing my son who is a computer geek he showed me a great way of rubbing out the top layer to show the bottom layer I thought I would let you know as it is so quick......Hope you find this helpful thanks again love all your cards so much, keep on inspiring people
Teresa xx"
Teresa xx"
Well it took me a little while to find the time to play with this method and sort it out but I am FINALLY passing this info onto you as an Updated Tutorial....here goes. Be warned it's picture heavy as I'm a visual learner and prefer to help you that way too and I wanted it to be a complete tutorial so I'm repeating many of the steps from my orginal tutorial.....
Also - you can click on individual pictures to get a close-up if you need too!

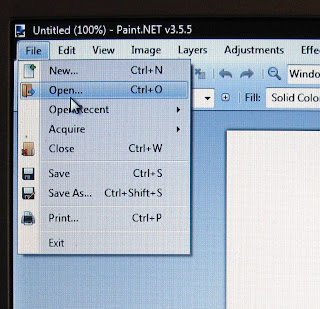
The first step is to open up the program and click on "File" to get the drop down menu. Select "Open"
Choose the image file you want to use - make sure it's the one that will the back image of your merged images - this is important as the second image will be sitting over the top of this one - so plan ahead! Click on the image you've chosen and then press "Open". I've chosen the adorable image "Kite" - you can find him HERE in Mo's store.
I used this week's sketch from Sketch Saturday to help me finish my card.
Copics used - Skin (E11, E00, E000, R20, R11) plus R39, R35, R27, R24, E44, E42, E40, C2, C00, BG99, BG96, BG93, BG91, B34, YR27, YR23, Y21, Y13

The first step is to open up the program and click on "File" to get the drop down menu. Select "Open"
Once he's open we need to make some room for the next image.
This screen will open up and you can use the placement boxes at the bottom to determine the position on the page of your first image.You will also need to make the picture area larger - you can do this by changing the width and height under the pixel size. For this example my next image won't be taller than Kite but she does sit lower - so I'm just going to make the canvas size wider and higher and postion Kite on the LHS in the middle. Don't worry if it looks too big - you can crop your final picture down later.
After pressing "OK" my new picture space looks like this. Before taking the next step make sure everything looks OK to move on - because once you move onto the next step you can't change anything done up to now without coming back to this spot. But if it's not right you can still change the canvas size and positioning before moving on.
Now to add in my next image!
I've chosen the super cute "Waiting for the Parade" image to combine with "Kite" this time - you can find her HERE in Mo's store.
AND NOW FOR THE UPDATED PART OF MY TUTORIAL!!!! Before you add your next image you need to open it in a separate window so you can remove the background to make merging easier.
Once you've opened her up you need to go to the drop down tools menu and select the MAGIC WAND.
Move over to the image and place the wand somewhere in the background and left click. You'll see the background turn blue - and sometimes parts of the image will too - in this case her face and bows. Be aware that all of these blue areas with become clear once you've finished so the image you are layering over the top of may have to have areas erased to accomodate for the clear areas - I'll show you what I mean later.
Once you have the area blue hit DELETE and you'll see a checkered pattern appear - meaning these areas are now clear.
There may be parts of the background that have remained white - just click on them with the magic wand again to clear. You can also clear areas like clothing for layering your image over digital papers for digital paper piecing - but that's ANOTHER tutorial - LOL.
To keep the background clear you need to save her in .png format so select the "save as" option from the menu and then select .png. Hit save and a "save configuration" box pops up and you hit OK. Now it's time to merge her in....
Go back to where you have your original image loaded with the canvas size enlarged. Then to add her in you go "Layers" in the menu and select "Import from File" from the drop down menu. Then find, select and open the file you want.
Go back to where you have your original image loaded with the canvas size enlarged. Then to add her in you go "Layers" in the menu and select "Import from File" from the drop down menu. Then find, select and open the file you want.
After you press "Open" she'll appear on your screen somewhere. You may find your second image is out of proportion to your original image - you can re size it by placing your cursor on the corner of the image box and shrinking or enlarging it to fit. You can see that the areas around her are clear letting you see your first image clearly.
Then just drag your new image into place. You can see where some of his jacket is visible in the middle of her forehead - this was what I was mentioning before. If you wanted to pop her here you would have to use the "undo" bottom to remove her and be able to erase this portion of his jacket.
To erase just go to the "Tools" menu and select "Eraser" from the drop down menu. It will come up fairly small but you can change the size using the "Brush Width" option - located to the right of "Tools" in the menu bar.
Luckily for me where I want to pop her there isn't an issue - so I just slide her into place.
To erase just go to the "Tools" menu and select "Eraser" from the drop down menu. It will come up fairly small but you can change the size using the "Brush Width" option - located to the right of "Tools" in the menu bar.
Once you're happy with your merged image you're ready to save it. Go to "File" on your menu and select "Save As".
Select a name for your file and then use the drop down menu to save your file - I usually save as a JPEG file but you can save in whatever format you like!
If you're saving as a JPEG this screen will pop up first. Just press OK.
Your next job is to crop the image down to remove the excess canvas - you can use whatever software you usually use for cropping. You can use Paint.NET too - just re-open your merged image into the software and draw a rectangle around what you want to save - using the "Rectangle Select" tool. Then go to "Image" and press on "Crop to Selection" in the drop down menu. Save your finished project.
You are now ready to print out as per normal.
I hope you find this tutorial useful - please feel free to ask me if you have ANY questions and I shall endeavour to answer them!
Copics used - Skin (E11, E00, E000, R20, R11) plus R39, R35, R27, R24, E44, E42, E40, C2, C00, BG99, BG96, BG93, BG91, B34, YR27, YR23, Y21, Y13


15 comments:
Your card is so adorable! I love that you merged the images. It looks fabulous!
What a great tutorials Debbie! You need to just pop over and make me a whole bunch of scenes and then I will be happy :) LOL
Oh these two look gorgeous together and fab tutorial.
luv
Debby
Fabulous card, and great tutorial. I love the vibrant colours.
So wonderful card,I love the images and the colours.
So gorgeous papers.
Hugs Riet.xx
your card is gorgeous i love the merged images. Great tutorial as well
caroline woodhall
Hello!
Combining images is my favorite thing to do and I love color. Your card is so wonderful - I love everything about it! The colors are amazing with the pattern papers! Beautiful! I have put this in my favorites file for inspiration! Thank you for another great tutorial! Wishing you a happy weekend!
Hugs,
Barbara Diane
I can imagine just how long this took you! You are an amazingly generous blogger, Debbie! My stamping is almost non-existent at the moment but I will know exactly where to go for help when I need thiis! I don't even have to bookmark ... Because I will remember that it was my lovely blog friend Debbie who has the neatest tutorial. Hugs xxx
Really gorgeous creation. I have been wanting to do this for a long time without success. Thanks for the neat tutorial. I will definitely practice this till I get it done.
hugs
bobbi
Thanks for the great tutorial!!
You are a life saver! I couldn't remember how to get rid of background ... so popped back to check here! Yep! All good! Hugs xxx
Thanks Debbie - I always forget the process as I don't merge images very often, and I know I can pop over here and follow your fab tut!! Hugs, Juliexx
I have been using paint for about the last year; and never realized you could merge images, thanks so much for sharing
Fantastic tut! Thank you so much for sharing.
Hugs,
Monny.
Oof! You lost me at pixel size. I never know what to choose ! It's random numbers to me. I will have to play around with it. Thank you for the tutorial !
Post a Comment