Pages

Saturday, May 1, 2010

Spesch Stamps Blog Hop

Hi and welcome to Spesch Designer Stamps first ever blog hop. You should have arrived from Paola's blog - however if you haven't, you can always hop back HERE to the Spesch Stamps Blog and start the hop from the beginning.

Today I'd like to introduce you to Kei - isn't she just the sweetest!!! Everyone on the DT will be showcasing this cutie - but they're not all the same! This one is Kei with Butterfly Balloon. I have used a square doily behind my Webster's DP - I loved the fact that there were butterflies flying in the background. The base DP is from Basic Grey - you can just see it peeking out from behind the doily.

Your next visit on the hop is Tracey's blog.

And just as a little sweetener for stopping by - someone who leaves a message on all of the DT posts has the chance to win the entire collection.

Have fun!

xXx

Thursday, April 29, 2010

My First Sweet Pea Card

With Kristy's store - Delicious Papercrafting - set to open any day now I thought I'd make my very first Sweet Pea card. I managed to get a couple of these gorgeous stamps from Kristy when I was over at her house and was checking out the goodies she had in for the store. These images are just beautiful - sooo much detail that they just seem to come alive when you're colouring.

I've used my black and clear Spica pens all over this gorgeous gal - you just can't see it in this light. I've take the picture on the left to show you how glittery she is - unfortunately the picture isn't as clear as I'd hoped but at least you get to see her sparkle! I have added some stickles to the flower arrangement for some more obvious sparkle.

The DP is from Basic Grey - some 12x12 sheets I found in my stash. One day I'm going to sort through my stash and work out exactly what I have there - but for the moment it's a bit like a treasure hunt - LOL.

xXx

Wednesday, April 28, 2010

Queen For The Day - A Quirky Mother's Day Card

I recently got this FABULOUS Kraftin' Kimmie Queen stamp from Kellie at Tickled Pink Stamps. I thought she'd make a fun and quirky Mother's Day card for my mum. My mum is not the tradional "vase of roses" gal and I think this will suit her to a "T"! I figure Mother's Day is the perfect day to give her time off from cleaning the castle and for making her feel like a queen - LOL.

Kellie also challenged us to use buttons with our creations this week - can you see the 3 on here??? I decided I didn't have any buttons in my vast stash that would be regal enough - so I popped some plain white ones on and covered the holes with pearls. The flowers also came from Tickled Pink Stamps Store and the DP is from Webster's.

I've also used my Spica pens on her - she has a very slight shimmer all over her veil - and more shimmer on the gold trim of her crown. My mum isn't into a lots of frills and fuss so I didn't want to glam her up too much - LOL.

LOVE YA MUM!

And now here's a little bit of fun for YOU!....

Kellie and the Pink Ladies and I have decided to put together a challenge blog for you all. And while it’s great to have weekly and fortnightly challenges as we all love entering them, time is not always on our side. So we have decided to go MONTHLY giving you all plenty of time to get that relaxing craft time we all know and LOVE…

Coming May 8th  - so write it down -  book it in - you won't want to miss out with a Tickled Pink MAJOR PRIZE give away for our first challenge. Become a follower as you will NOT want to miss it!

For now how about a stamp give away…..? YEAH, all you have to do is pop our challenge badge on your blog/sidebar and link to Mr. Linky and you could be the lucky winner…. What’s the stamp? NOW that is a surprise coming in May! Be one of the firsts to own your own…. You have until the challenge opening and the winner will be announced on the challenge post on the 8th of May 2010… Jump over HERE….. NOW to get your name in to win!

xXx

Tuesday, April 27, 2010

"It's Show Time" at The Burtonesque Dolls with a Blog Hop!

Welcome to the start of what we hope will be a funtastic crafting adventure for all. The Burtonesque Dolls  are open for business and we're starting with a fun Blog Hop so you get you meet the DT in all their crafting glory.

If you've arrived here from Catherine's blog you're on your way. But if you've just happened upon this post you can always go back HERE to the START to check out the fabulous prize on offer and the rules of the game.  

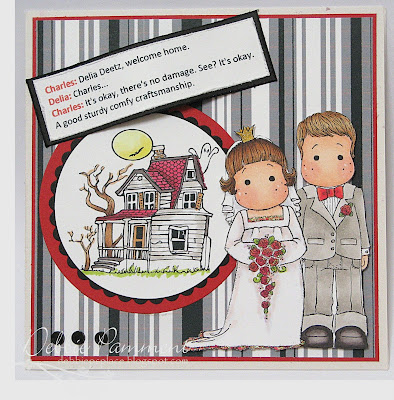
The theme for our blog hop is the movie Beetlejuice. I used the movie poster to inspire me. The B&W stripe DP is a free digital paper from the wonderful Jak Heath. Beetlejuice's suit inspired the use of this particular paper. I've used Magnolia Stamps Bride and Groom for Barbara and Adam. The haunted house is a colouring page I found HERE on the internet. The movie quote was also found on the internet and just seemed to suit the card.
Before you go here's the clue you need to collect from me....

" Could go searching for victims in the London fog "

Before you go to the next stop in the blog I have this little prize for someone who comments on my blog. I'll be selecting a winner using random.org on May 4th - the date we have our very first challenge!!! My prize is your choice of 3 wonderful digital images from Spesch Designer Stamps.
Now head off to Jen's blog to collect the next clue.

Good luck and have fun!

xXx

Monday, April 26, 2010

Sammi's Challenge - Using Shades of the One Colour

I recently received an email from the lovely Sammi from Mad for Markers. She asked if I would be a guest designer for her next blog challenge - to use shades of the same colour, ie a monochromatic colour scheme. I love any opportunity to play so of course I said YES - the housework can wait - AGAIN - LOL!

As you can see I decided to use sepia tonings and create a vintage style look. Using the cracked glass technique on my image just added more texture and interest. I must admit to having a problem or 2 "cracking" these guys - I popped them in the freezer and forgot about them - OOPS! When I cracked the image several hours later parts of the embossing lifted right off the paper - aaagh. After doing this TWICE - I'm such a ditz at times and get distracted easily - I discovered some hints! DO NOT reheat the embossing from the top - it can push the parts that have started melting away as the other parts are still hard!!!! DO heat from UNDERNEATH the image - you get a much better re-melt!

I've used the following Copic colours and paper - all available from Sammi's store - Mad for Markers!

Thanx for having me Sammi.

Face - E000, E00, E02, R20
Hair & Clothes - E11, E31, E33, E34, E35, E43, E47, E49, E51, E55, E57
Paper - Neenah

xXx

Mo's Challenge #28 - A Recipe

This week Mo's Challenge DT have a recipe for us, one of the non -fattening types. We need to use 1 Ribbon, 2 Buttons or Brads and 3 Designer Papers on our creation.

After I coloured up my image I found this week's Friday Sketchers layout would work perfectly for 3 DPs. I used some Basic Grey papers and some build-a-brads from Stampin' Up as 2 of my "ingredients". The ribbon is left over from a present my daughter got - she knows to save ALL ribbons for her hoarding mum - LOL.

You can't see it in this picture but I've used my clear spica pen to add some shimmer to Little Lee's outfit and to the frosting on the cake. Lee's wings are even more glittery - with a good coating of dazzling diamonds.

xXx

Sunday, April 25, 2010

Magnolia Down Under Challenge #43 - Charms


This week over at Magnolia Down Under Challenges we are asking you to use charms on your entry. I was all ready to colour up my Tilda and Edwin pirates and use my piratey charms when I saw this little cutie stamped out in my stash! It was one of those Aaaaw moments. I had stamped her off from Kellie sometime last year - and I think it was time she came out to play!!! Luckily I had this cute dummy/pacifier charm in my stash too - it was bought in another Aaaaw moment - LOL.

I love seeing the older style Magnolia's come out - you forget how really cute they are - and how much Tilda has grown - this was her at about 6 months old - hehehehe. The DPs are from Magnolia and were brought at Kellie's store - Tickled Pink Stamps - as were the yellow flowers, leaves and lace. The white flower was from my stash!

Now it's YOUR turn - but don't forget to see what the other MDUC DT have created - amazing inspiration for all!

xXx

Saturday, April 24, 2010

Mother's Day From Spesch Stamps

Yesterday Tracey sent her Spesch Stamps DT an email saying she wanted to release this gorgeous Mother's Day image today and if anyone had a chance could they put a card together - after all - Mother's Day is only a couple of weeks away here in Australia. This beautiful image would also be gorgeous for a baby card.

I already had her printed out ready to colour - and a bit of time - so off I went for a play! She was just FABULOUS to colour and everything just seemed to work - don't you love it when that happens - just wish it happened more often!!! And having just checked the Spesch Stamps Blog I can tell you the DT have done a fabulous job to come up with some truly gorgeous cards. But if you get a great image half the battle is done!

My layout was inspired by one of Mo's Challenges DT - Sandy - when I saw her DT card for this week's challenge I knew I would have to CASE her layout sometime - I just didn't think it would be this quickly - LOL.

My DP is from Stampin' Up - I just loved the colours - I am a bit of a green lover though!

xXx

Friday, April 23, 2010

Faux Wood Frame - A Tutorial for Tickled Pink Stamps

To make the wooden frame I've used on THIS card and THIS card is actually fairly simple - and yet it's sooo effective! Kellie asked me to put together a quick tutorial for the Tickled Pink Stamps Blog and I thought I'd share it here too - just in case you want to try it out for yourself.
All the supplies I've used are from Stampin' Up - so if you don't have these colours you may have to experiment a little!
Supplies:
More Mustard Card Stock
Inks - Chocolate Chip, Close to Cocoa (retiring soon!), More Mustard and Whisper White
Scissors
Paper Cutter
Black Pen


Start off by dragging your inks across the cardstock from one side to the other side - don't worry too much about being neat - it will just add to the wood grain look.

You'll need to use More Mustard first, then Close to Cocoa, then Chocolate Chip and then Whisper White.

Make sure you leave a little drying time between each colour otherwise the "woodgrain" lines can blend together!


You should end up with something that looks like this! Now make sure you leave a GOOD half an hour for this to dry before moving on - or use your heat gun to speed up the process - the white ink takes FOREVER to dry!!! The original tutorial I used for Faux Wood stopped here - but I felt the white needed toning down a little and popped some more streaks across it.


I used another layer of More Mustard and Close to Cocoa - in that order. If you like you can also use a dash of Chocolate Chip - it depends how dark you want your finished "wood" to be - and how heavy handed you were with the lighter colours!


So this is your finished A4 sheet of Faux Wood - you'll be able to make several frames out of this one sheet - let me show you HOW!


Start off by deciding what you want the finished size of your frame to be. For demonstration purposes this one is 1" wide and will be 5" square. So I cut 1" strips and then cut them to 5" lengths - you'll need 4 of these.

On the back of each strip number them from 1 to 4 and lay them out in order.

Overlap the corners and cut diagonally across. By overlapping and keeping them in sequence the corners should fit together well - even if they aren't cut quite straight.

The first frame I made I used my hubby's set square and tried to cut nice accurate 45o angles - unfortunately they didn't fit together properly as they were all cut slightly different. I also find my method ensures I get the size of frame I want - and EASILY - we ALL like EASY don't we - LOL!


So here is your frame - just ready to be stuck together and used on your project. Just use some tape on the back to stick it together. You can also "pop" your frame up on your project with dimensionals like any other image you use - it's now a design element! Just one last thing to give it a "real" frame look...
 
Add some dots to the corners with a black pen to give the impression your frame had been "nailed" together.
 
Now that doesn't look too hard does it???? I'd LOVE to see YOUR finished project if you give this a go!

xXx

Tuesday, April 20, 2010

Mo's Challenge #27 - A Sketch

Mo's Challenge Team have a fabulous sketch this week - I just love sketches - the variety of ways they are used always astounds me!!!

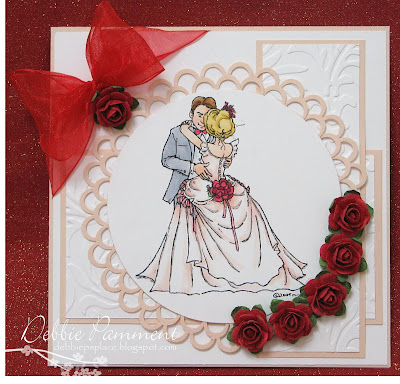
I've been wanting to use this gorgeous Bridal image for a while now - I have a few weddings coming up so thought I'd make a start on the cards! I thought the beautiful lines of her gown just needed to be paired with simple elegant colours and textures so she's still the focal point. I hope I've achieved that.

I have to thank the inspirational Norma for her tutorial on using border punches for framing - check it out HERE. I wasn't sure this one would work but I'm rapt with the result! You never know until you try!

The rest of the card is pretty self explanatory - there are roses, ribbon, cuttlebug folder and I've used my markers to colour...

xXx