Pages

Monday, November 30, 2009

Christmas Can Be a Cracker


A couple of weeks ago I was shopping with a friend and came across a really cute Christmas cracker made by Jessica Walker Chocolates. It came with a chocolate inside. I saw the potential and decided to buy it - much to my daughter's surprise when I got home and she exclaimed "You paid $3.95 for ONE chocolate!!!" I quickly explained she was welcome to the chocolate - I wanted the box as a template - LOL. I can thank the lovely Karen Thomas from Luv to Stamp for teaching me to look at packaging and it's potential. A friend recently thought I was a little odd when I raced to KFC to buy some Popcorn Chicken for the box after seeing Karen's fabulous project - LOL - check it out here. Of course my popcorn chicken box is hiding somewhere in my crafting space waiting to be used as a template - but I know it's there when I want it!!!

I took the empty cracker off to Stamp Camp on the weekend - it was actually made in 2 parts but I wanted to simplify it and make it from a single piece of card. I've worked out the dimensions for you if you want to make one for yourself - yours will work out a tiny bit larger as I wanted to make the measurements a bit easier to follow!

To decorate mine I used DP and lace from Magnolia - available at Kellie's Magnolia Down Under Store. The tag is one of Bizzy Becs new Digital Tickets available at Bec's new Digi Downloads Store. The CS is from Stampin Up - Kraft and Real Red. The flowers were from a local craft store.

Now here are the measurements for you - feel free to contact me if they don't make sense! The great thing about these Crackers is that you can open then up easily without tearing them by simply untying the ribbon bows in the valleys!

Cut your card 7" x 5"
Across the 5" edge score at 3/4", 1 1/2", 2 1/4", 3", 3 3/4", 4", 4 1/2"
Across the 7" edge score at 1", 1 5/8", 2 1/4", 4 3/4", 5 3/8", 6"
Embellishments as desired.

Use the shaded areas on this picture to work out where to remove CS. For the triangles I cut from halfway up the middle score line in the section - this doesn't need to be acurate and I just pencilled mine in - it's where the cracker folds in. This score line is also the only one to be a valley fold - the rest are all mountain folds. The line across the top with the rectangles removed is the tab for the join.
I hope you have some fun with these - I will be looking forward to seeing yours - please let me know if you make one!

Now I better go feed the hungry hordes and have an early night!! Stamp Camp was sooo much fun but I had waaayyyy to little sleep - it was a little hard concentrating at work today - LOL. I do have more fun things I made at camp to show you - but some of them are DT work so will have to wait a little!!!

Hope you all had a FANTASTIC weekend too...

Edit - When Bec saw this she realised she had the sentiment wrong - I certainly hadn't noticed had you??? This one says "the means you" instead of "that means you". She has since corrected it and re-sent it to all those who had already bought this set! So if you had noticed the mistake don't let it put you off buying these fabulous digital tickets.

xXx

Friday, November 27, 2009

Sorry Guys!!!!

I just wanted to let you know I haven't dropped off the face of the Earth - LOL. I have family arriving from overseas in a week and have been trying to get ready. I have also been madly organising myself for a weekend away at Stamp Camp - yahoooooo!!! I'm heading off in about an hour!

Hopefully I'll have some fun projects to show you next week - I know I'll be cleaning and moving beds then too - AND work has asked me to put in extra time (noooooo!!!) - so am hoping to get a HEAP of crafting done this weekend!!

Take care and I'll be back soon....

xXx

Wednesday, November 25, 2009

Basic Grey Christmas!


It seems to me that the Christmas craziness has begun early this year - the week's seem to be racing ahead and there's sooo much to do!! I saw my DD off to schoolies today, have a weekend of stamping away coming up - and relatives arriving for Christmas in less than 2 weeks - aaagh!!! I think the one sanity in my life is my crafting!!! And since it's Wednesday today I get to play over at The Stamp Spot Blog - LOL.

Have you noticed - NO COLOURING!! And virtually NO STAMPING either!!! But with these gorgeous Basic Grey Eskimo Kisses papers it would be silly NOT to make them the feature event! I love these papers sooo much I picked up the whole paper pad from The Stamp Spot Online Store early on! This little village scene is soo cute, and combine it with the cuttlebug ornaments embossing folder it makes a fairly quick and easy card - which still has a bit of a wow factor! So remember to look at your DPs as main images and not just for backgrounds - and with all the fabulous papers Marcia has instore at The Stamp Spot I'm sure there's something for everyone!! The snowflake is a Spellbinders die - I'm just LOVING this die!!

xXx

Monday, November 23, 2009

The Greeting Farm's New Digis


Last week The Greeting Farm released a fabulous collection of digital fairies - and I think I had mine within a few hours - LOL. My daughter's BF recently turned 18 and I knew I wanted this beautiful fairy to put on her card. The big party was last Saturday night, once all the final exams were done. The party's theme was "white" and one of her favourite colours is purple - so I had all the elements in place! All I needed now was a layout - soo I went and visited Mojo Monday and used their sketch #113 - the sketch for last week.


I really wanted to layer the flower so I used 3 flowers and which I coloured, cut and shaped - before glittering the edges and layering them up. A large pearl in the middle finished it off. I also coated the wings in Dazzling Diamonds for extra sparkle - what's a fairy without sparkle??? With the flower being the focal point I really didn't want to add to much other embellishment - so have finished up with quite a clean card. A bit of Cuttlebug embossing and some chipboard numbers and I was done.

xXx

Sunday, November 22, 2009

Magnolia Down Under Challenge #27 - Something for Christmas


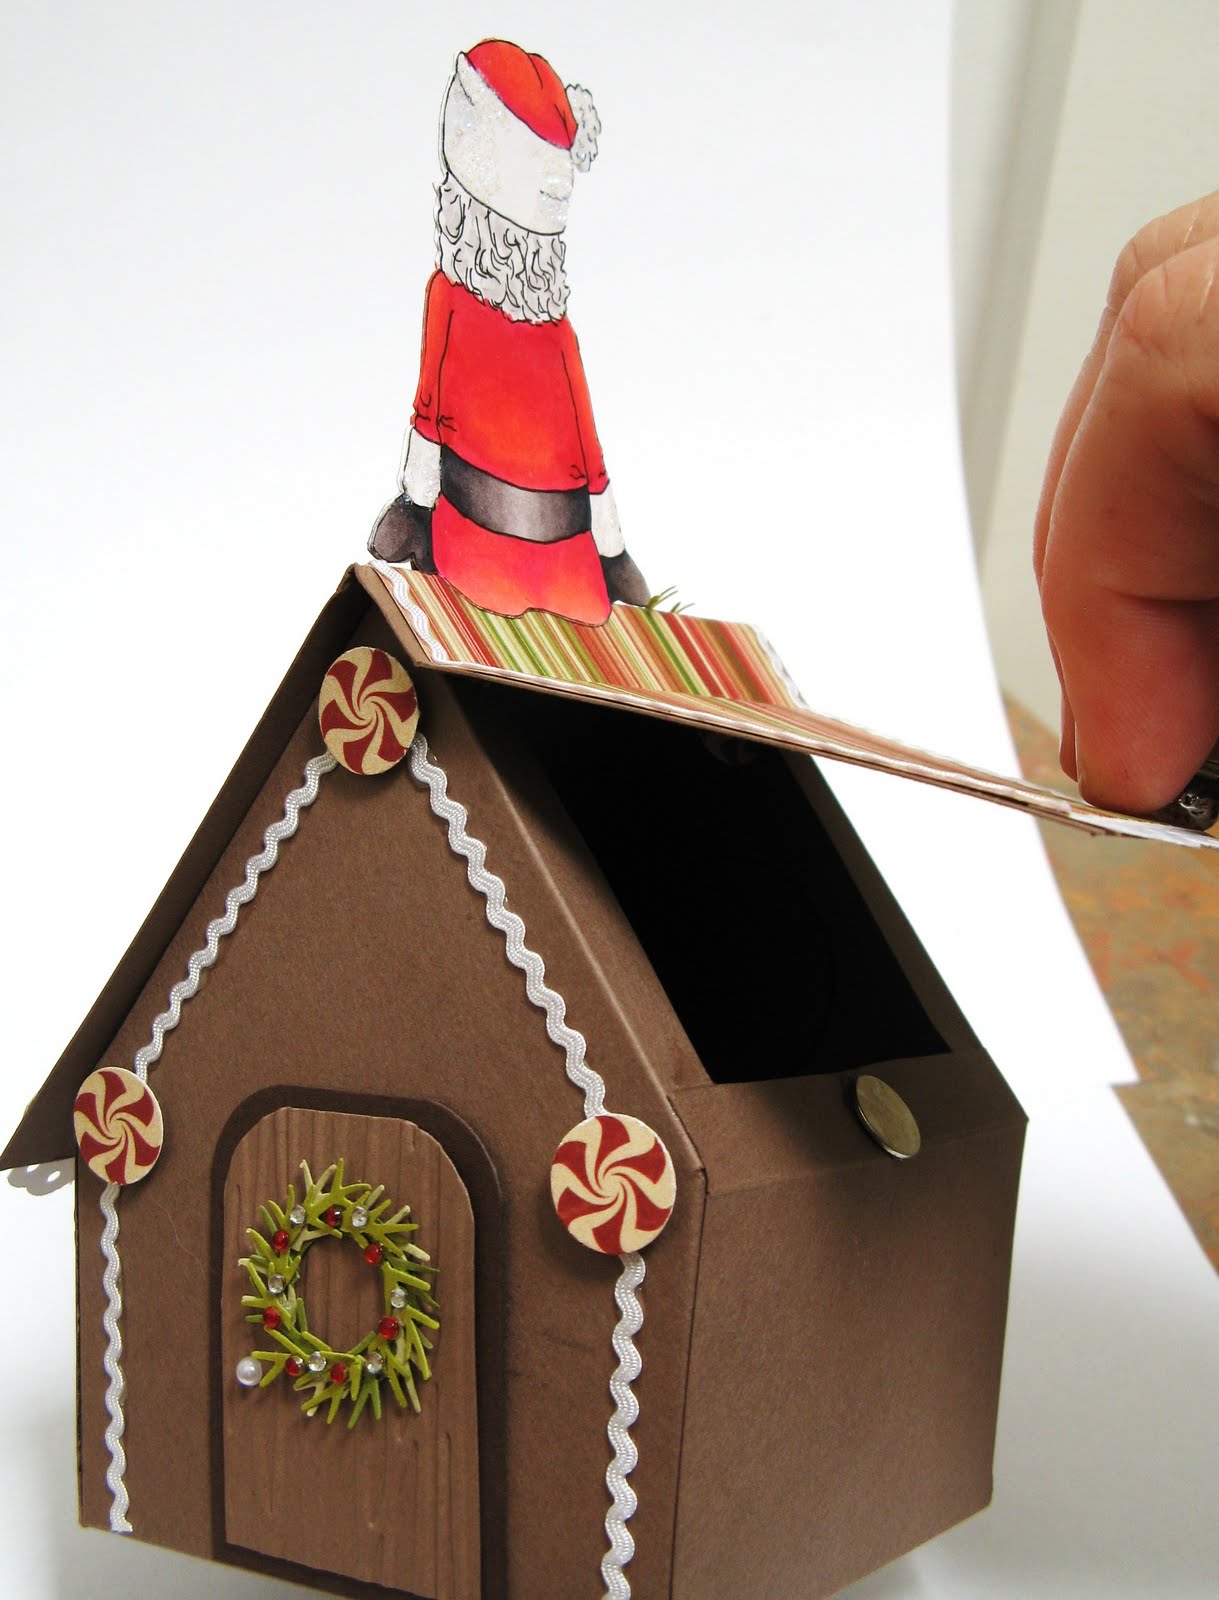
This week's challenge over at Magnolia Down Under Challenges has been a bit of fun - to make something for Christmas! Now don't get scared off - it CAN be a card! I had an idea for this Gingerbread House when I received my first edition of Magnolia Ink Magazine from The Magnolia Down Under Online Store! In the magazine there was a tutorial for an adorable birdhouse - I have basically just adapted that tutorial to make this! The major differences are that I haven't cut out the bird house "hole" and I've made the flap fold up about 1/2" below the top of the roof - so I didn't have to put a bend in poor Santa's tooshie - OUCH! It's a fairly simple box - I am very tempted to make another more elaborate one - but I was running out of time! I think a few chockies in here and it will make a great little gift for someone!

You may be wondering HOW Santa ended up HAVING a tooshie - LOL. I used a very pale pink inkpad - SU's Pink Pirouette - and my mirror image stamp to stamp Santa in reverse onto some Whisper White CS. I then free hand pencilled in Santa's back view before going over it with my Copic liner and colouring him in. I really wanted him sitting on the roof top and just couldn't come up with another background I liked to cover his back! He's sandwiched together at the top with the front of Santa and just split over the pitch of the roof.
I also made the little wreath for the front door. I punched a ring out using my 1/2" and 3/4" circle punches. The fronds were the tips off the fern punch. I used 3 different tones of green and some mini red and clear rhinestones for decoration. I've added a white pearl for a door handle too.
The mini white ric rac was found at the Paperific show last weekend - perfect!!! I punched the "lollies" out of some 2007 Cosmo Cricket DP I had - using 1 in a build-a-brad for the handle of the box - the brad was fed through a bead to before being fixed so that it sat up a bit. A magnetic clasp holds the lid shut. The roof DP is from Kaiser.

Now off you go to check out what the rest of the MDUC DT has made to inspire you. And thanx to Kellie for sponsoring the challenge with this gorgeous stamp for our winner...hmmmmm - wonder if I can enter under another name - LOL.
STOP THE PRESS!!!  Special on Magnolia Christmas Stamps at Kellie's….

From today until Wednesday, 25th of November 2009 you can get 20% OFF any Christmas stamp available in store at Magnolia Down Under. It has finally been confirmed that these gorgeous guys and gals will be arriving at Kellie's around the start of the week. The excitement from the DT is infectious so jump on board and join the fun!!! LOL.

Pop over HERE and don’t miss out!

xXx

Thursday, November 19, 2009

Anya Ink Challenge #7 - A Boy's Card


This week's challenge over at Anya Ink seems relatively simple - to make a boy's card! It amazes me how difficult this simple sounding brief can be! Recently I re-watched Pirate's of the Carribean and it inspired me to use this fabulous Pirate Ian that I bought from The Stamp Spot. A couple of week's ago Anya Ink had challenged us to tole our images and I enjoyed this so much I decided to re-visit and toled this guy. The top of the scarf, the skull on his belt and the eyepatch were shaped slightly using an embossing tool. I also paper pieced his bandanna and scarf.
The sentiment is from The Greeting Farm too - as is the skull and crossbones image I used to create a faux brad (using Crystal Effects over the image). The DP is from Kaisercraft and was found hiding in my poor neglected stash!

All in all this challenge wasn't too hard once I made the decision of which image and DP to use - it just seemed to come together! Don't you just love it when that happens!!!

xXx

Wednesday, November 18, 2009

Christmas at The Stamp Spot


One of the things I love about being on a DT is that sometimes you get to play with things you wouldn't usually have - and it's always fun to see what goodies arrive in my DT kit! This angel from Stampendous is one of those things! Marcia over at The Stamp Spot sent me a stamped image to play with and I have decided she's just gorgeous. I had seen this stamp before but had honestly only given it a passing glance! But to have the image stamped in front of me and then to see it come to life with colour - hmmmm - I think she'll be on my next order!!! It just goes to show you need to REALLY look at images sometimes and imagine them stamped up!

My daughter saw this card sitting on the coffee table and asked who had sent it - because she really liked it! She was surprised when I told her it was mine - and not finished yet, I still had to put on the bling! She thought it was soo not my style - but that again is the fun of experimenting! I actually love this card and the papers from Bo Bunny have been the perfect choice. I used both sides of the paper and was surprised how different they were - but how fabulous they looked together!

My image has been cut using my nesties - with the same size nestie being cut in 2 colours to frame her - I trim the end points off and then split them in 2 down the middle. To bling her up I added Dazzling Diamonds to the tips of her wings and the base of her dress, and some Kaiser pearls on the card.

The beautiful stamp, DPs, flowers and nesties are all available from The Stamp Spot - and don't forget to stop in at The Stamp Spot Blog to see what other fabulous inspiration the DT have for you!

xXx

Sunday, November 15, 2009

Guest DT for Creatalicious Challenges #4

I was blown away last month when Bec and Cheryl asked me to be their GDT for their 4th challenge at Creatalicious Challenges. I was even more stoked when Cheryl emailed me the brief - it was MADE for me and not really a challenge at all - LOL. What is it you ask - Christmas, Glitter and Snowflakes!!!

My first step was to choose an image to use - not really hard as I had recently bought these adorable digital penguins from Angel's Landing - they are just too cute! I used my Touch and Copic markers to colour them before adding Dazzling Diamonds to all the white areas of their clothes.

Now onto the snowflakes - I machine embroidered the base snowflake in a blue thread that's close to SU's Baja Breeze. I then layered on some Spellbinders snowflakes with alternate layers being treated with Flower Soft and glitter before putting them together with a diamonte brad. And don't forget the embossed snowflake background!!!

A few pale blue rhinestones finishes off the glitter requirement - I just wish once again that glitter would photograph - this really does sparkle IRL. The DP and sentiment is from Stampin' Up.

On a side note - I have been toying with making and selling my embroidered snowflakes - I'd appreciate any expressions of interest to see if it's worth doing!

Now don't forget to pop over to Creatalicious Challenges to check out the rest of the fabulous inspiration from the regular DT and give the challenge a go yourself!

xXx

Friday, November 13, 2009

Cards For A Cause - Search for a Meningitis Vaccine

I have 2 cards for you today using some a couple of very special images. As you know I'm a huge Mo Manning fan and yesterday when I visited Mo's Digital Pencil Too blog I read the sad story of 16 month old Layton John Cleaver who succumbed to meningitis recently - you can read the story HERE. To help raise funds to find a vaccine for this horrible disease, Mo and fellow designer Jim Harker have donated a fabulous digital image each - you get BOTH of these gorgeous stamps for 4 UK pounds - not only a wonderful treat for yourself but together we may help find a way to stop help gorgeous children like Layton from dying. I can tell you I have never bought stamps soo fast my life - if you're interested you can get them HERE.

This first card uses Mo's fabulous image called "Out There". This sweet boy looks set for all sorts of adventures - with his faithful companion by his side to keep him safe. I'm not quite sure how he ended up with these colours - sometimes my colouring just seems to take on a life of it's own. I started off doing his top in a pale blue - but it clashed terribly once I did his shorts. A bit of yellow over the shirt and the whole scheme changed - for the better I think! I couldn't help myself - I added flowers to a boy's card - but the olive green felt flowers and the button centres make it not too girly!!! The DP is from Upsy Daisy. This second card was made using Jim Harker's gorgeous Little Soldier snowman. To me he's a bit of a cross between The Nutcracker and Frosty the Snowman - 2 of my favourite Christmas characters. I've made another snowflake using chunky glitter. The DP and sentiment are from Stampin' Up.

Now I'm heading off to cuddle my kids and hope we can help find a way to stamp out this disease - and many others! It amazes me how the internet and some marvellously talented people can do soo much! Thanx Mo and Jim.

R.I.P Sweet Baby Boy!

xXx

Thursday, November 12, 2009

Just Christmas and Birthday Cards Sketch #49

I haven't had much chance lately to play over at Just Christmas and Birthday Card Challenges so I'm rapt I had an opportunity today! This week's sketch is by Karin and I just love it! I have twisted it on it's side though.

The reason I had a chance to stamp was that without any warning the electricity company decided today was the day they needed to replace our connection to the grid! So without power and unable to leave home as they needed access to the garage, it was the perfect chance to craft! I was supposed to be out sourcing blinds or curtains for the room my BIL and his wife will be staying in when they arrive next month from England! Guess what I'm up too tomorrow - LOL.
I've used some DP from Stampin' Up and paired it with Whisper White and Pacific Point CS. The sentiment is also from SU - a retired set called Flaky Friends. The snowman is from last year's Magnolia Christmas collection - I thought he better see ink before my new season snowman gets here - you should check out the new ones at Bizzy Becs - they are sooo cute - it was hard to stop at getting just one of them!
The large snowflake is a nestie and I have covered it with Crystal Iris Chunky Glitter from SU. I may have resigned as a SU demonstrator recently but I still love their products! I have topped these with a plain punched snowflake and a pale blue rhinestone!
Now to work out which one of my friends this one will go to at Christmas - there's a few it might fit - LOL.
xXx